Lead Setup Configuration
Guide to full Lead Configuration setup in Chakra Sales
Overview:
Use the lead setup configuration settings to setup and modify and tailor your lead pipeline process as per your business needs. The following setup modules with basic overview of the module configuration and how to manage the configuration of each
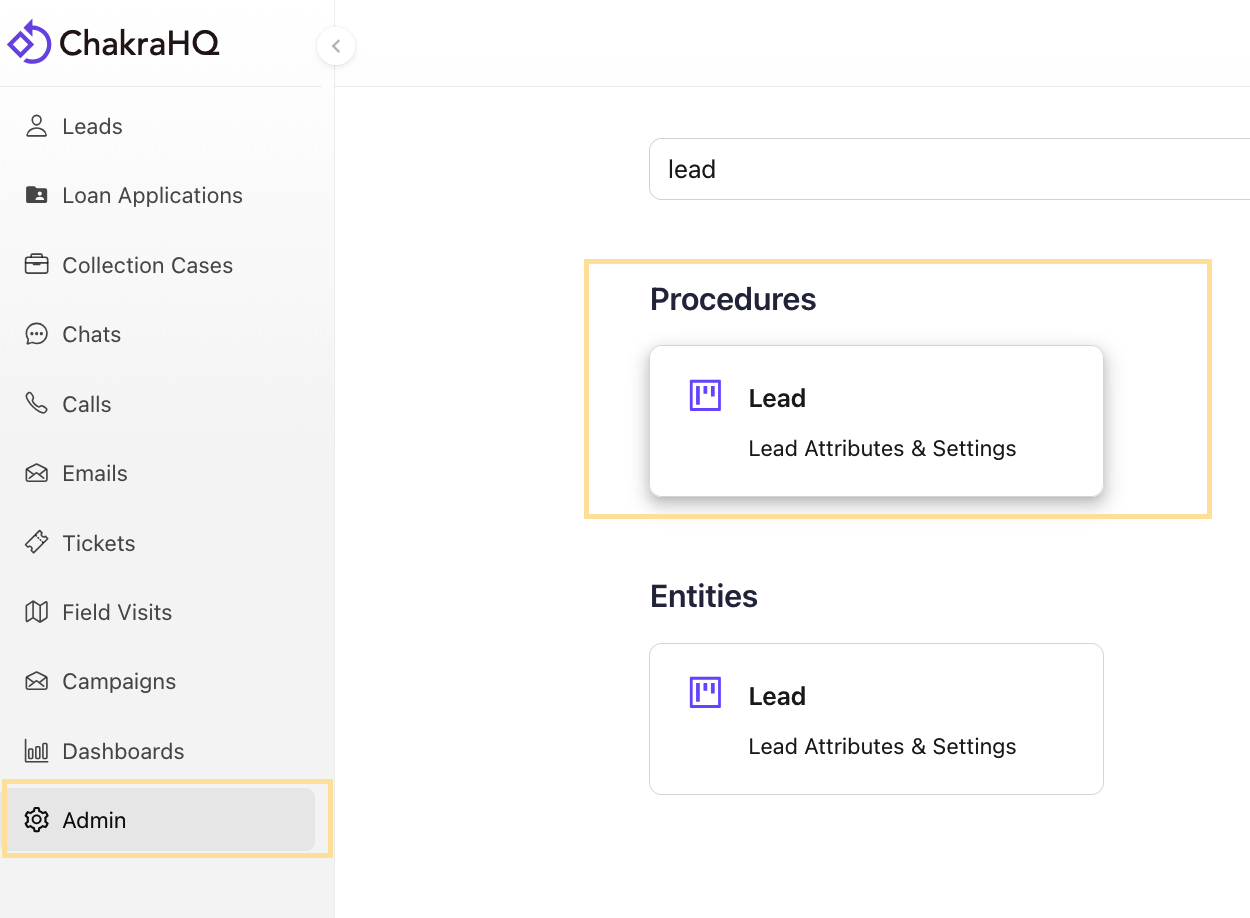
Access Lead Configuration
- Go to
Adminin the left-side navigation bar - Search for Lead in the Admin section
- Click on the
Leadin the Procedure sub-section
1. Details
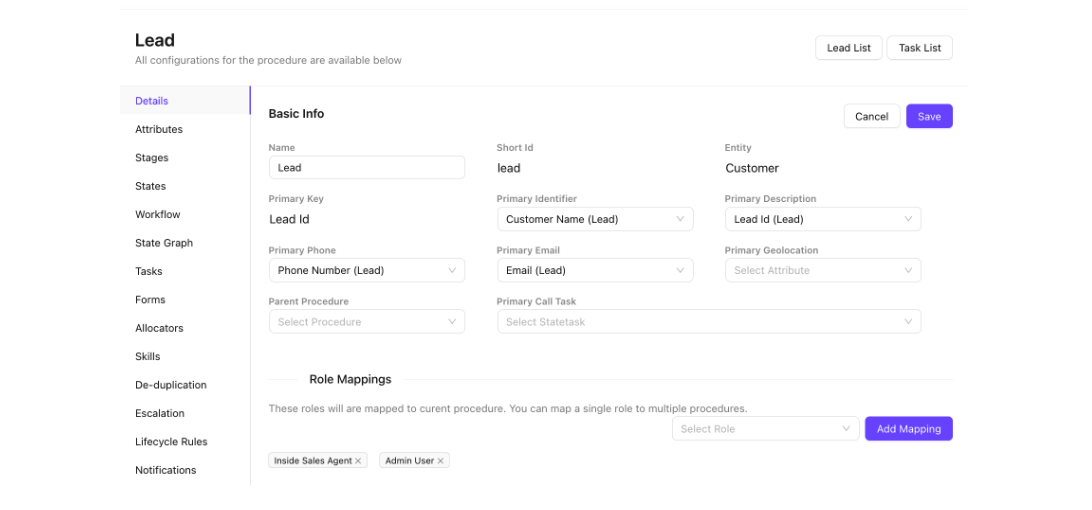
The Details section is the starting point for configuring your lead process. It defines how leads are identified, structured, and accessed across your organization.
Key configurations include:
- Primary Lead Key – the unique identifier used to distinguish one lead record from another.
- Primary Phone Number / Email Field – designates which contact fields are treated as the primary point of reach.
- Key Identifier Field – controls which field is displayed as the lead's label across list views and reports.
- Role Access Mapping – define which roles in your organization can have access to the leads process to manage leads within the Chakra Sales CRM.
2. Attributes
Attributes define the custom data fields associated with a lead record. These are the properties that capture relevant information about a lead beyond the default system fields.
- Create and manage custom fields such as text, dropdowns, dates, checkboxes, and numeric inputs.
- Mark attributes as required, optional, or hidden based on your data capture needs.
- Control which attributes appear on lead forms, list views, and detail pages.
- Use attributes to drive segmentation, filtering, and reporting across your pipeline.
Standard vs Derived Attribute:
Standard attributes are data fields that are directly entered or captured from a source - exactly as provided, with no calculation or transformation. They represent raw facts about a lead.
Examples: First Name, Email Address, Phone Number, Company Name, Lead Source, Date Created
Derived attributes are fields that are automatically calculated or inferred based on other data points. They don't exist on their own - they're generated from standard attributes or system logic.
Examples: Lead Score (calculated from engagement + firmographics), Time in Stage (calculated from timestamps), Lead Age (today's date minus created date), MQL Status (derived from score threshold)
Create Lead Attribute
- Click on
➕ Add Lead - Choose type of attribute from Standard or Derived
- For Standard Attribute, add the following details in the attribute creation form
- Attribute
Name - [optional]
RequiredToggle (Yes/No).Noby default Short Id: a unique identified in lead records.Attribute Type: String, text, date, integer, float, document, etc. To understand all the lead attribute types please check this lead attribute type guide- [optional]
IndexedToggle (Yes/No). No by default (indexing is primarily done to significantly improve search performance and data retrieval speeds.)
- Attribute
Manage Lead Attributes List
- Access lead attributes in a list in the Lead Attribute Settings
- Search Attribute by the name or short_id in the Search Bar
- Filter Attribute by All Attributes, Standard Attributes or Derived Attribute filter
Manage Attribute Configuration
- Click on the Attribute name in the Name column
- Access the Attribute details in the configuration page
- Attribute Name (editable)
- Attribute short_id (editable)
- Id (unique system identifier)
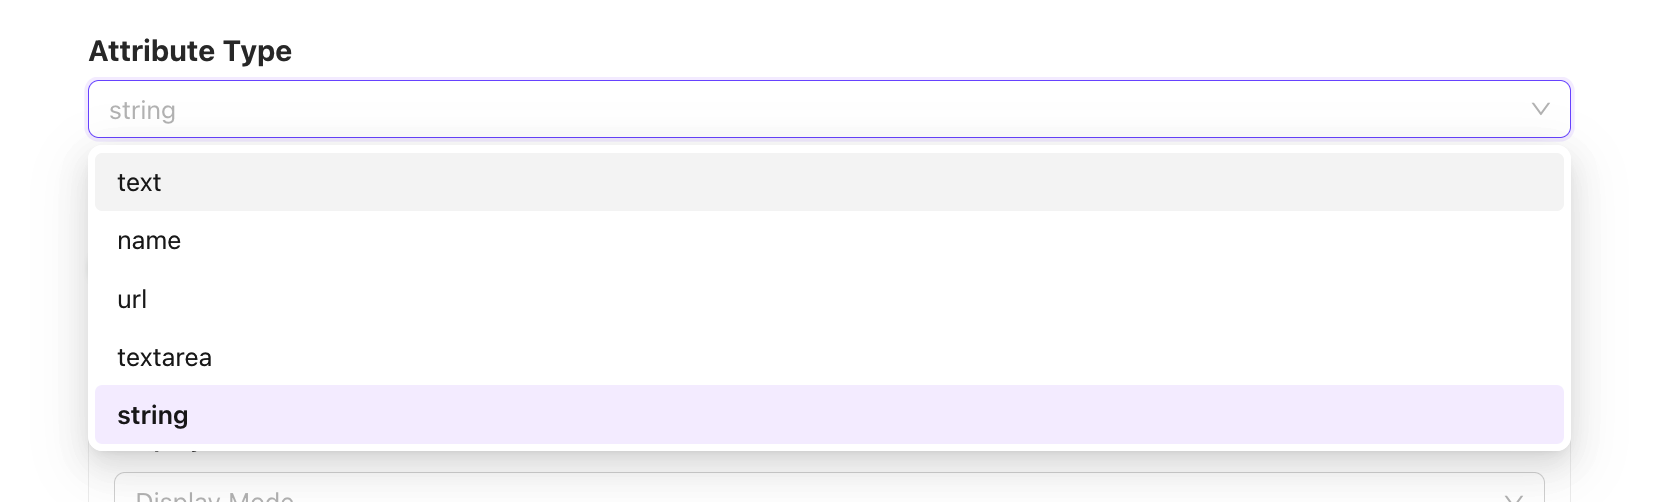
Indexedtoggle (Yes/No)- Attribute Type (Editable for some)
- Other attribute field settings as per the attribute type
- Some attribute type can be changed after creation (text, name, url, textarea, string)
3. Stages
Stages allow you to group multiple Lead States into broader cohorts, making it easier to manage and report on sales pipelines that have a high number of granular states.
- Create named stages (e.g., Prospecting, Nurturing, Closing) and assign relevant lead states to each.
- Use stages to get a high-level view of pipeline health without losing the detail of individual states.
- Stages are especially useful in large teams or complex sales cycles with 10+ distinct states.
- Stage-level reporting enables sales managers to track conversion rates at a funnel level.
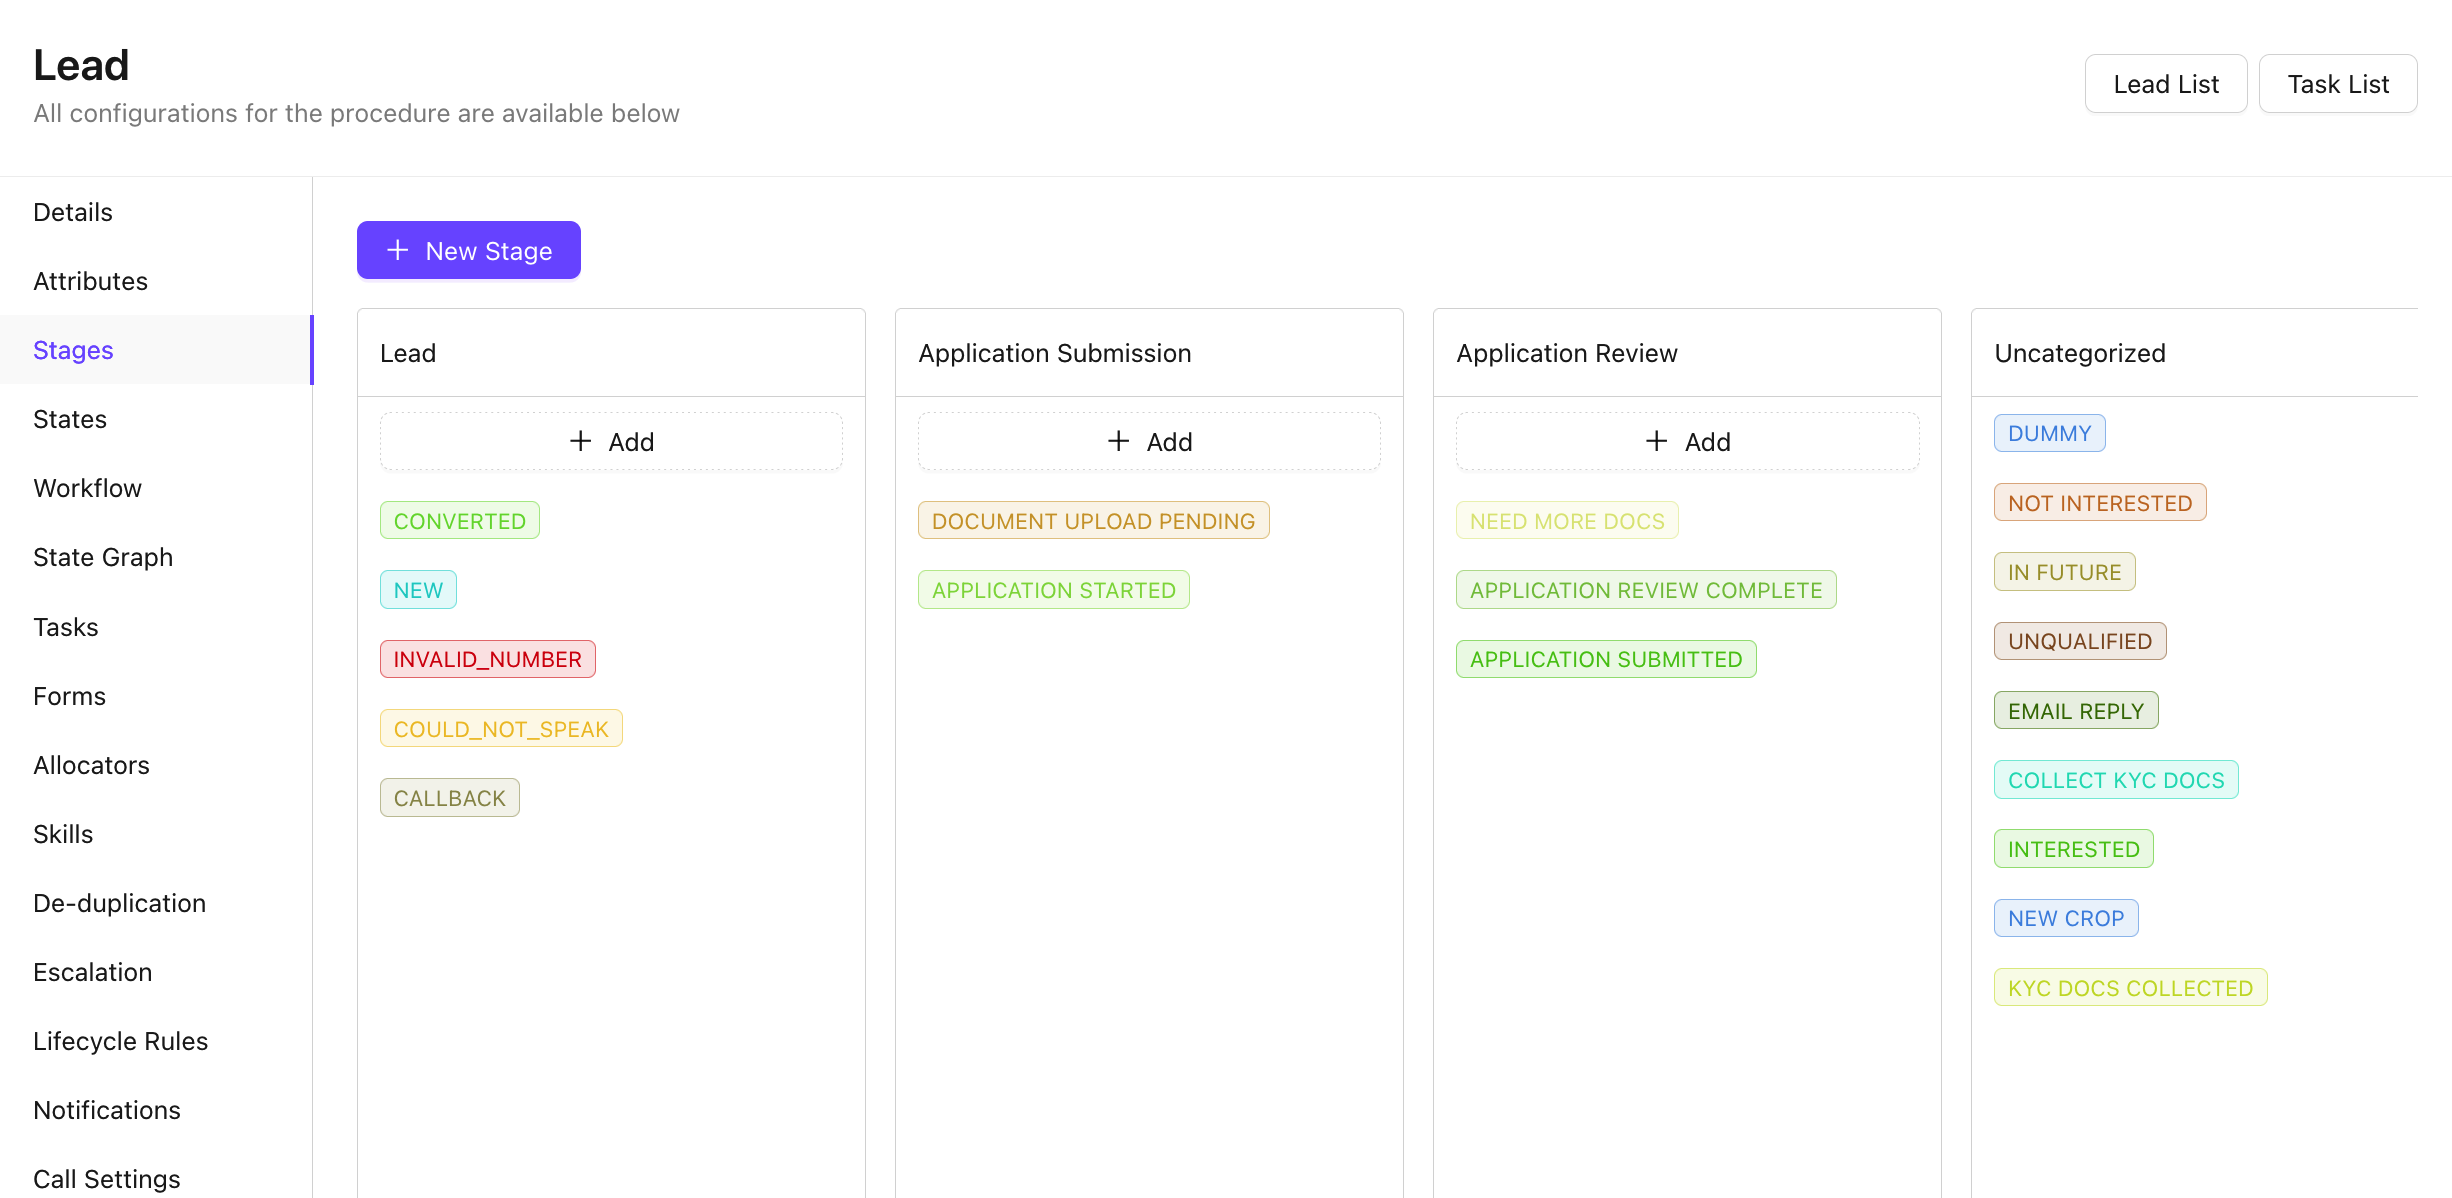
Manage Lead Stages
Create a New Stage
- Click on
➕ New StageButton - Add Stage Name, ShortId, Description
- Click on
Submit
Edit a Lead Stage
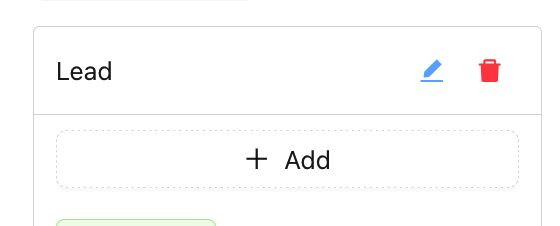
- Click ✎ to edit lead stage name or description
- Use 🗑️ delete option to delete a stage
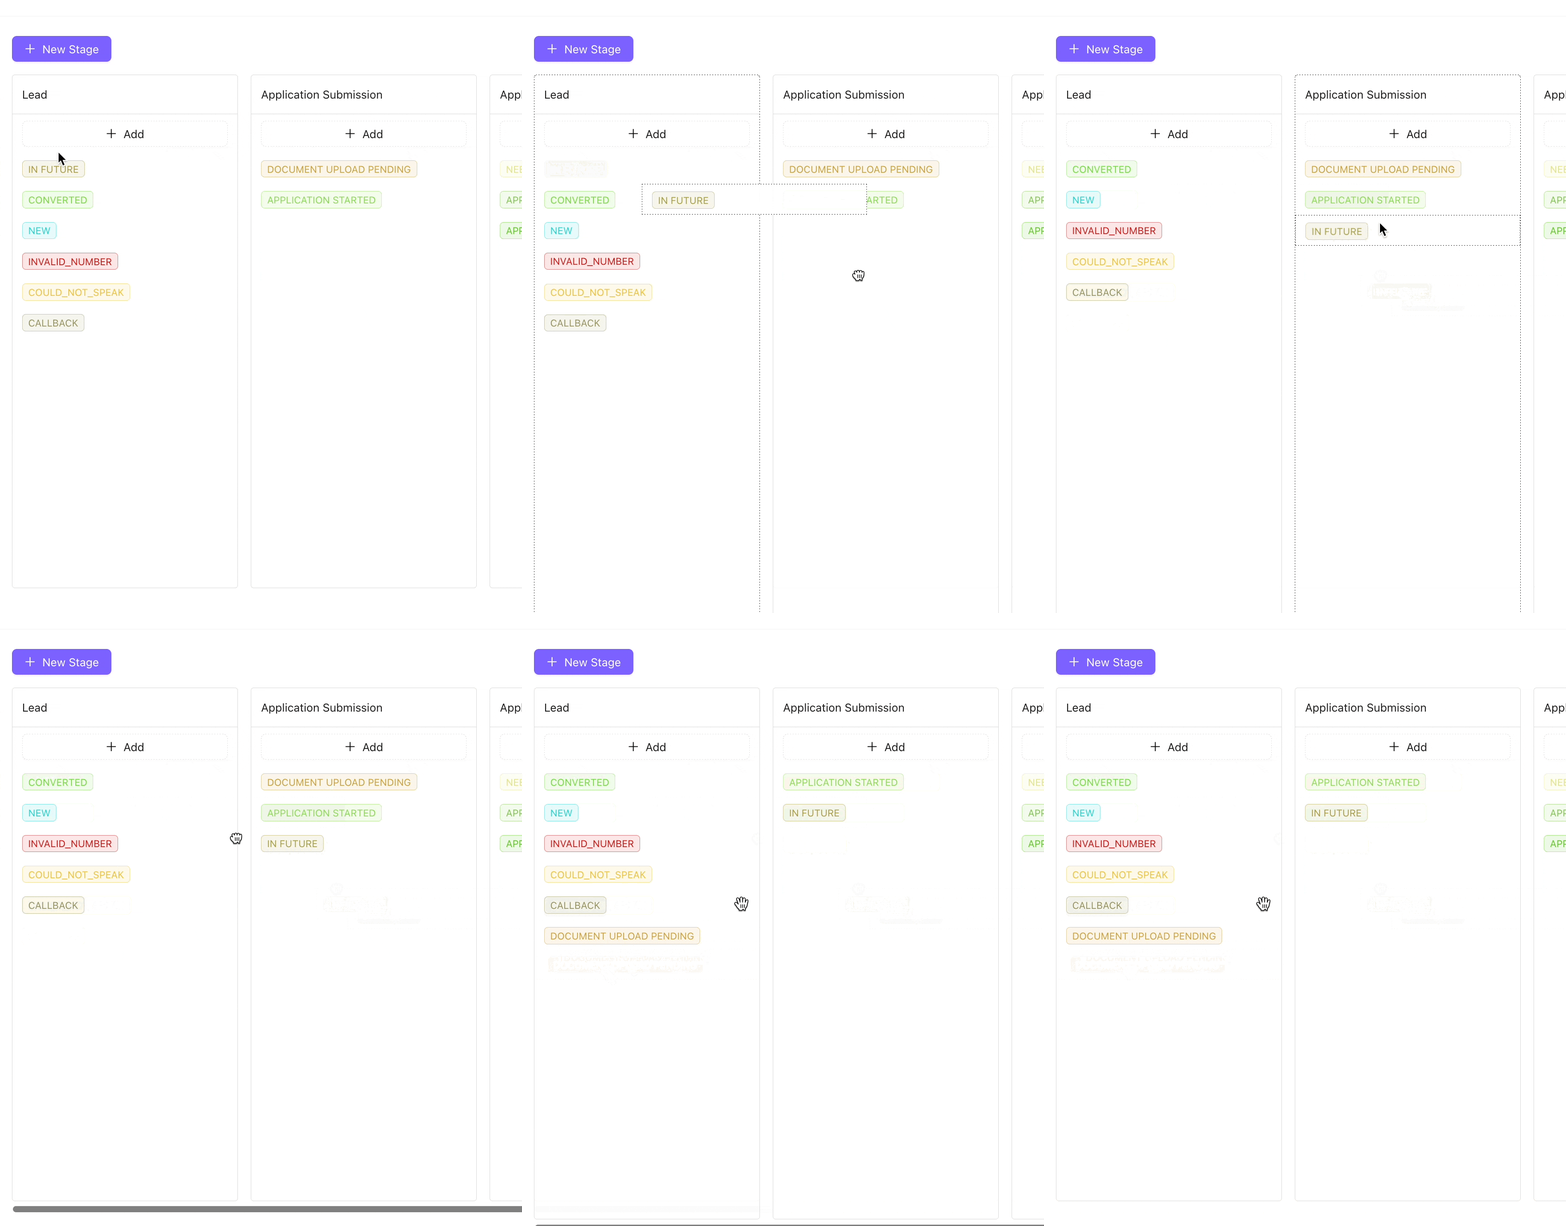
- Add a State (from list of unmapped states) in a Stage using the ➕ Add button
- Drag-and-drop a lead state from one Stage to another
4. States
Lead States are the most granular nodes of your sales workflow. Each state represents a specific step a lead can be in during the sales cycle.
- Define states such as New, Contacted, Qualified, Proposal Sent, Negotiation, Won, or Lost.
- Assign colors to states for quick visual identification in list and kanban views.
- Set terminal states (e.g., Won, Lost, Junk) to mark the end of the lifecycle for a lead.
- States feed into the State Graph and Workflow to define allowed transitions and automation triggers.
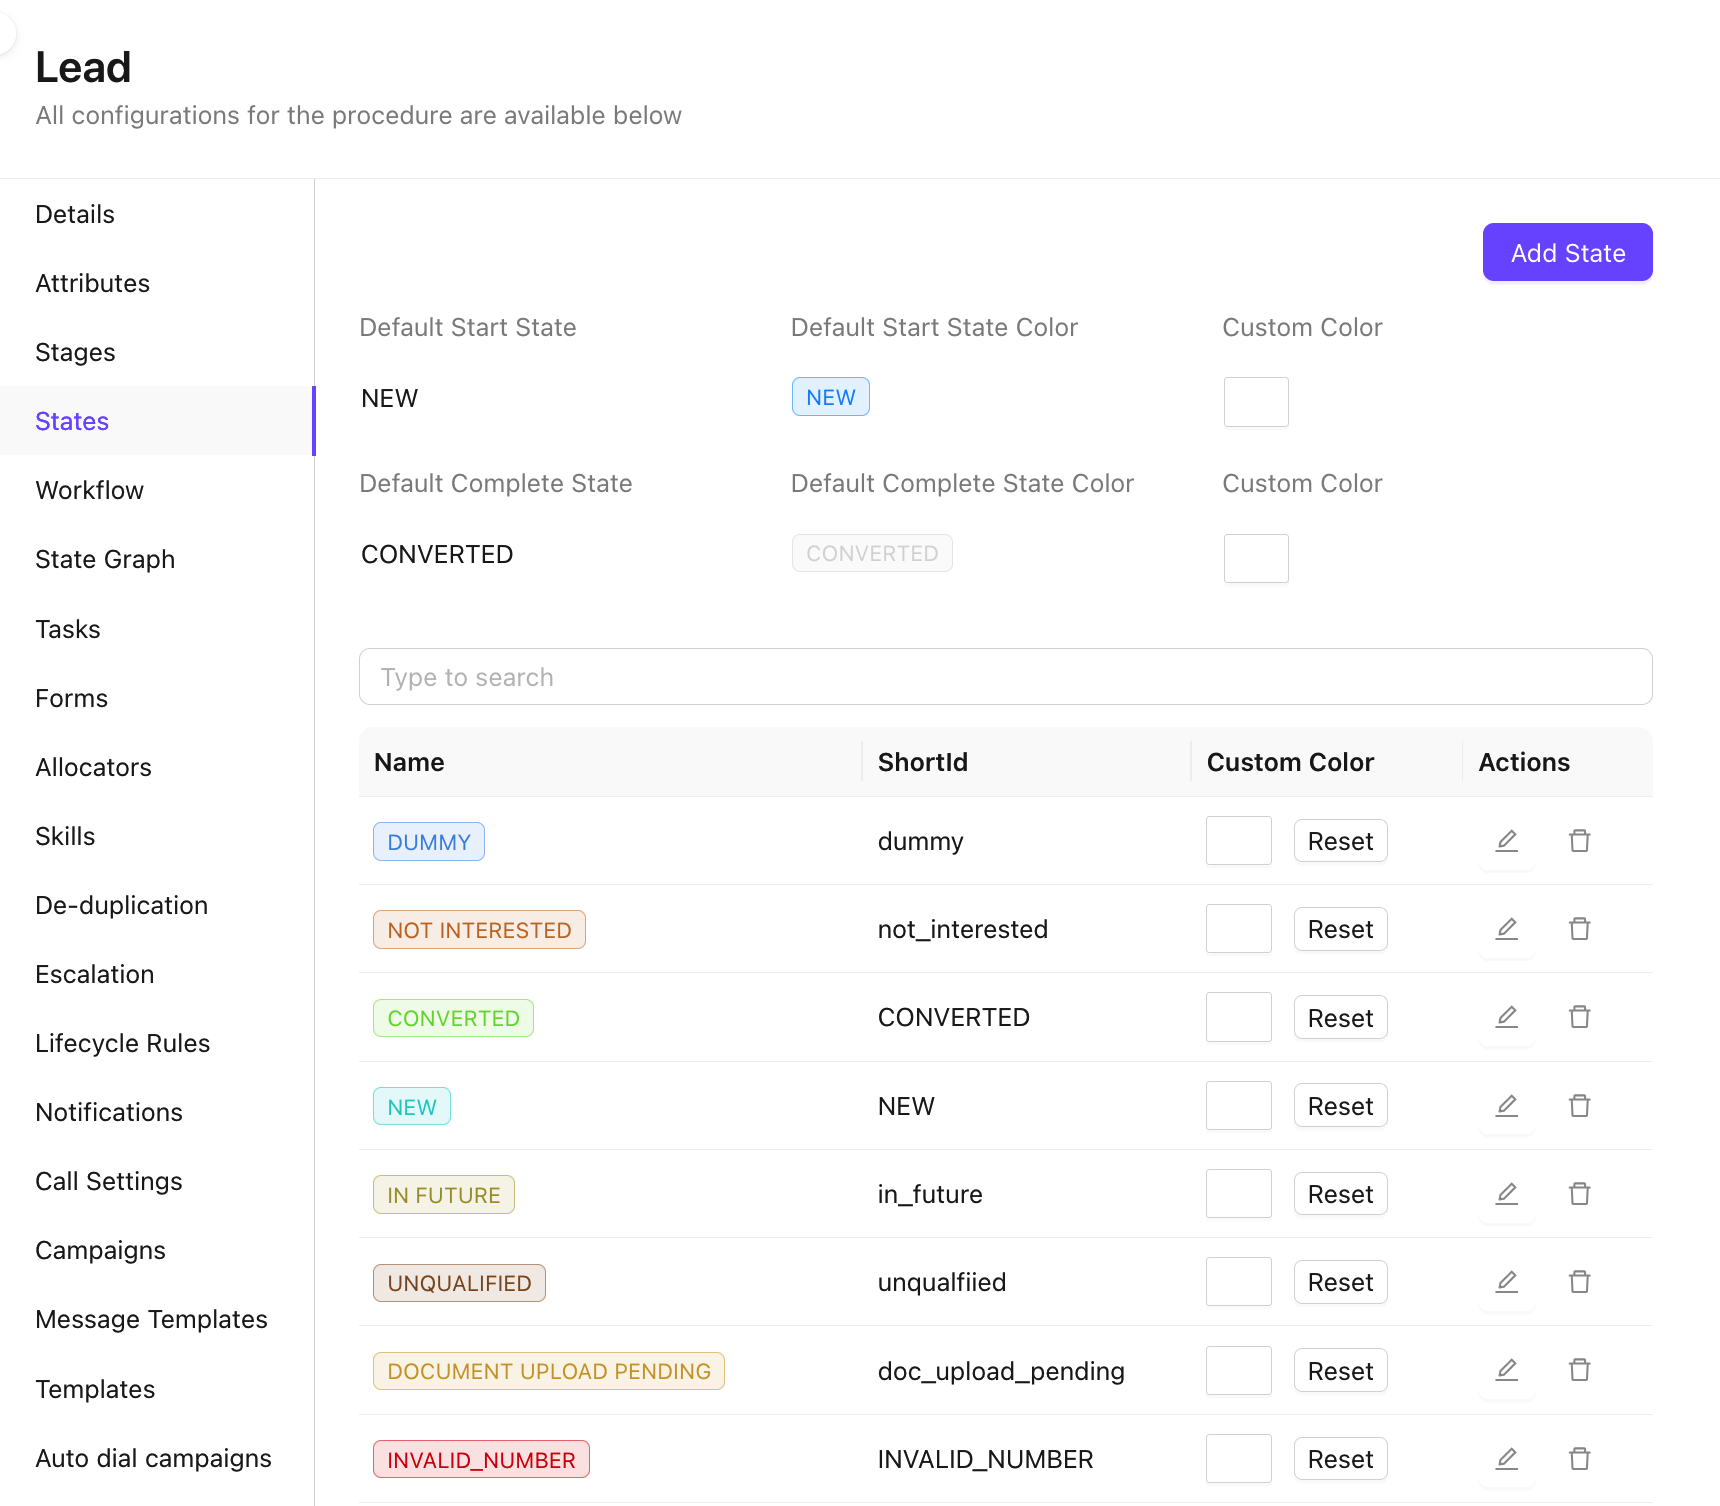
Manage Lead States
Create New State
- Click on
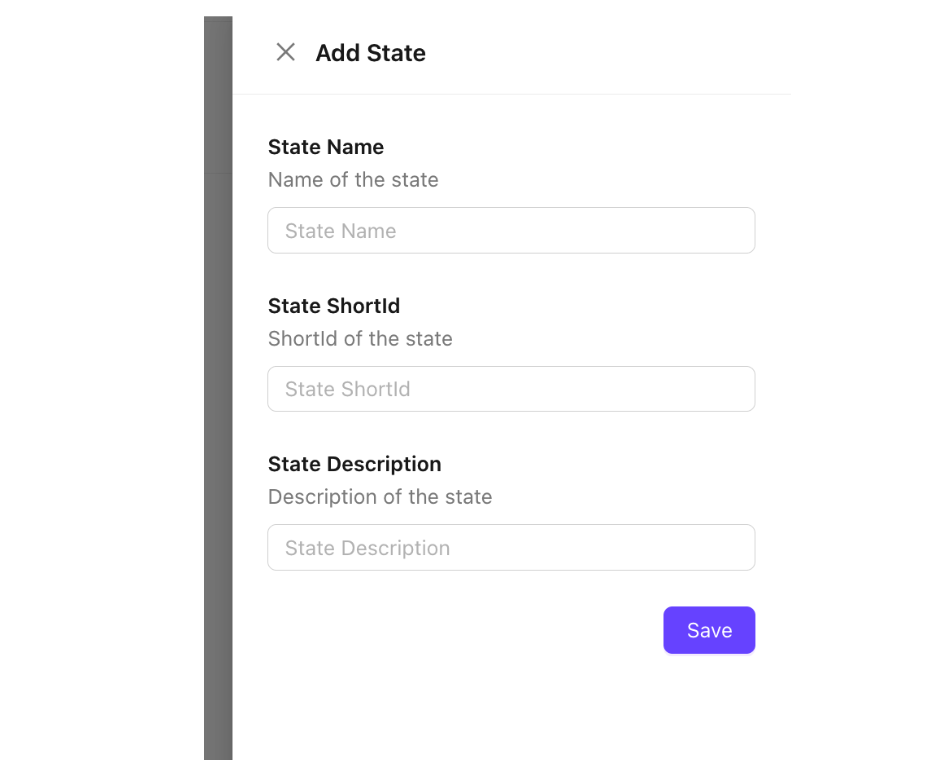
Add StateButton - A new state configuration form drawer pop on the right-side
- Add the State Name, State ShortId, State Description
Edit Lead States
- Access the lead states from the state list
- Add Custom Color using the custom color button.
- Reset color using to default (green) using the
ResetButton - Using Action Button
✎Edit or🗑Delete the State permanently
5. Workflow
The Workflow section defines the rules and logic that govern how leads move through your pipeline. It ties together states, tasks, and automation into a cohesive process.
- Configure allowed state transitions – define which states a lead can move to from any given state.
- Attach mandatory or optional tasks to specific state transitions to ensure process compliance.
- Set up entry and exit conditions for states, including field validations or approval requirements.
- Workflows provide the backbone for consistent, repeatable sales execution across the team.
6. State Graph
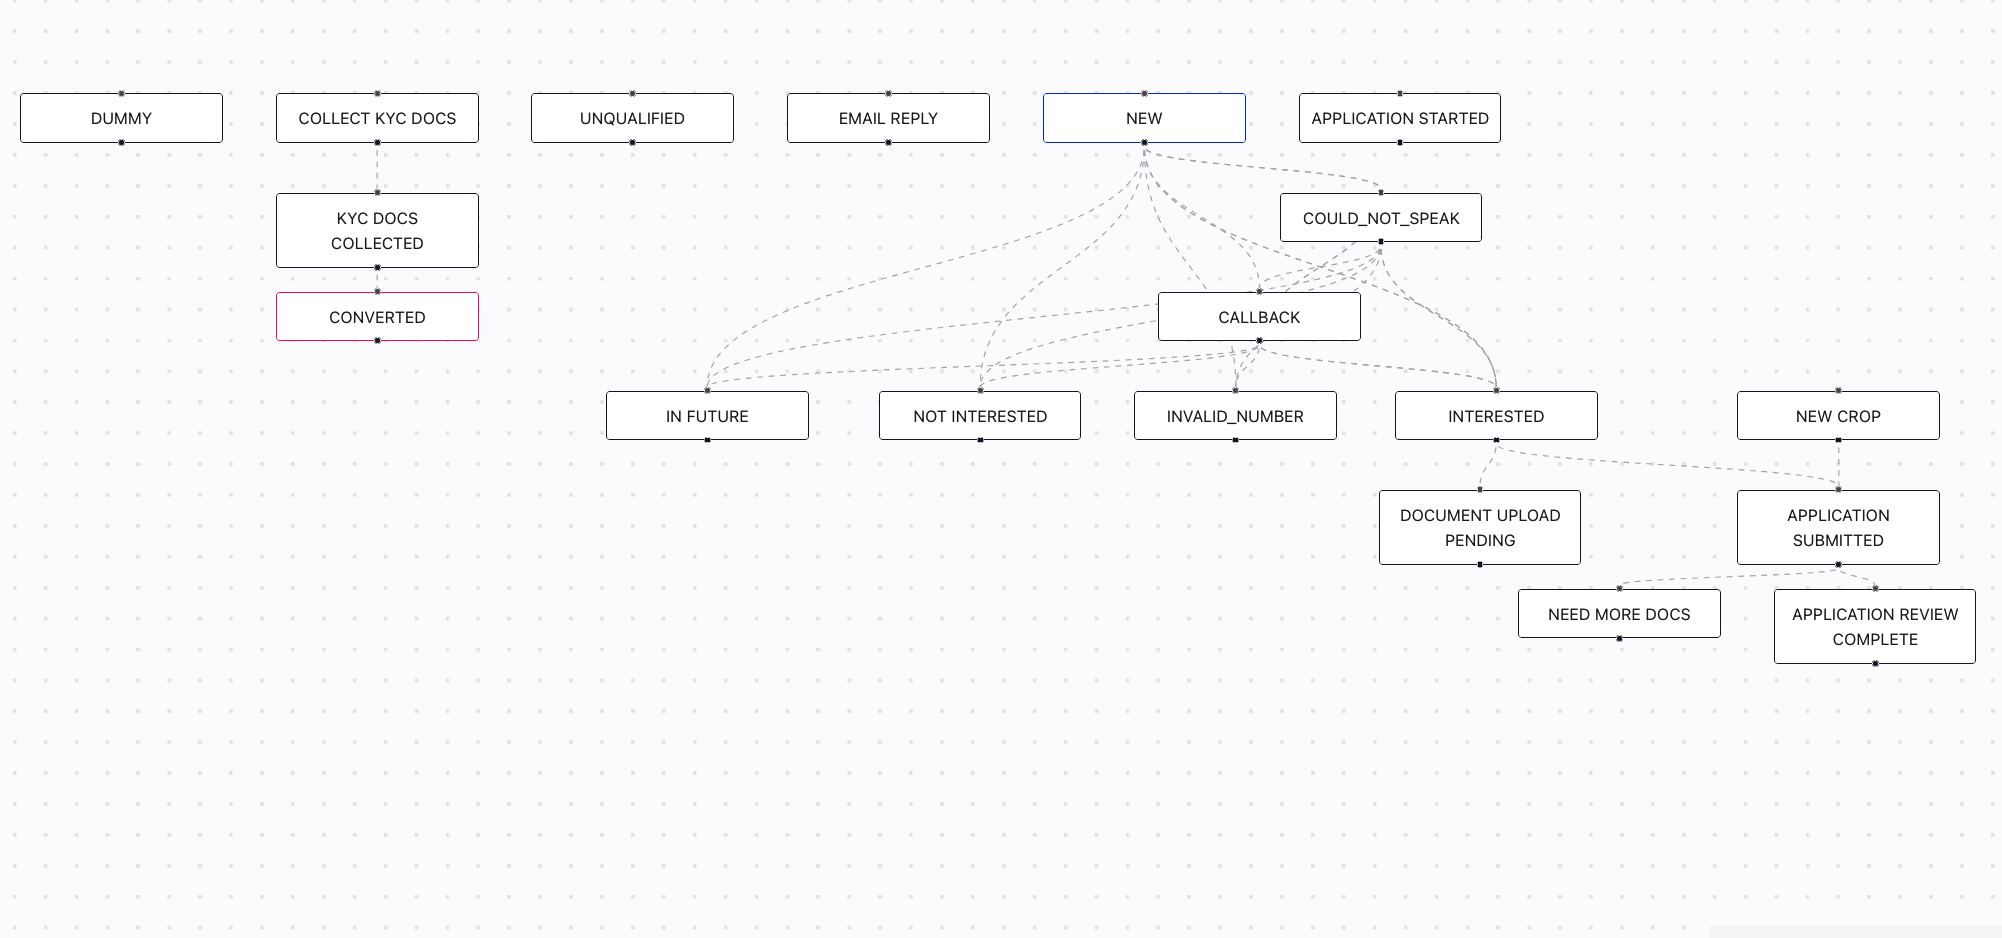
The State Graph provides a visual representation of your entire lead sales workflow. It maps out the relationship between states, the allowed transitions between them, and how tasks are associated with each step.
- View all lead states and their permissible transition paths at a glance.
- Identify bottlenecks or missing transitions in your sales process.
- Understand how tasks are linked to state changes and what actions are triggered on movement.
- Use the graph as a diagnostic and communication tool when onboarding new team members.
7. Tasks
Tasks are actions or to-dos that need to be completed as part of the lead handling process. They can be tied to lead states or workflows to enforce structured follow-ups.
- Create task types (e.g., Follow-up Call, Send Proposal, Schedule Demo) for consistent activity tracking.
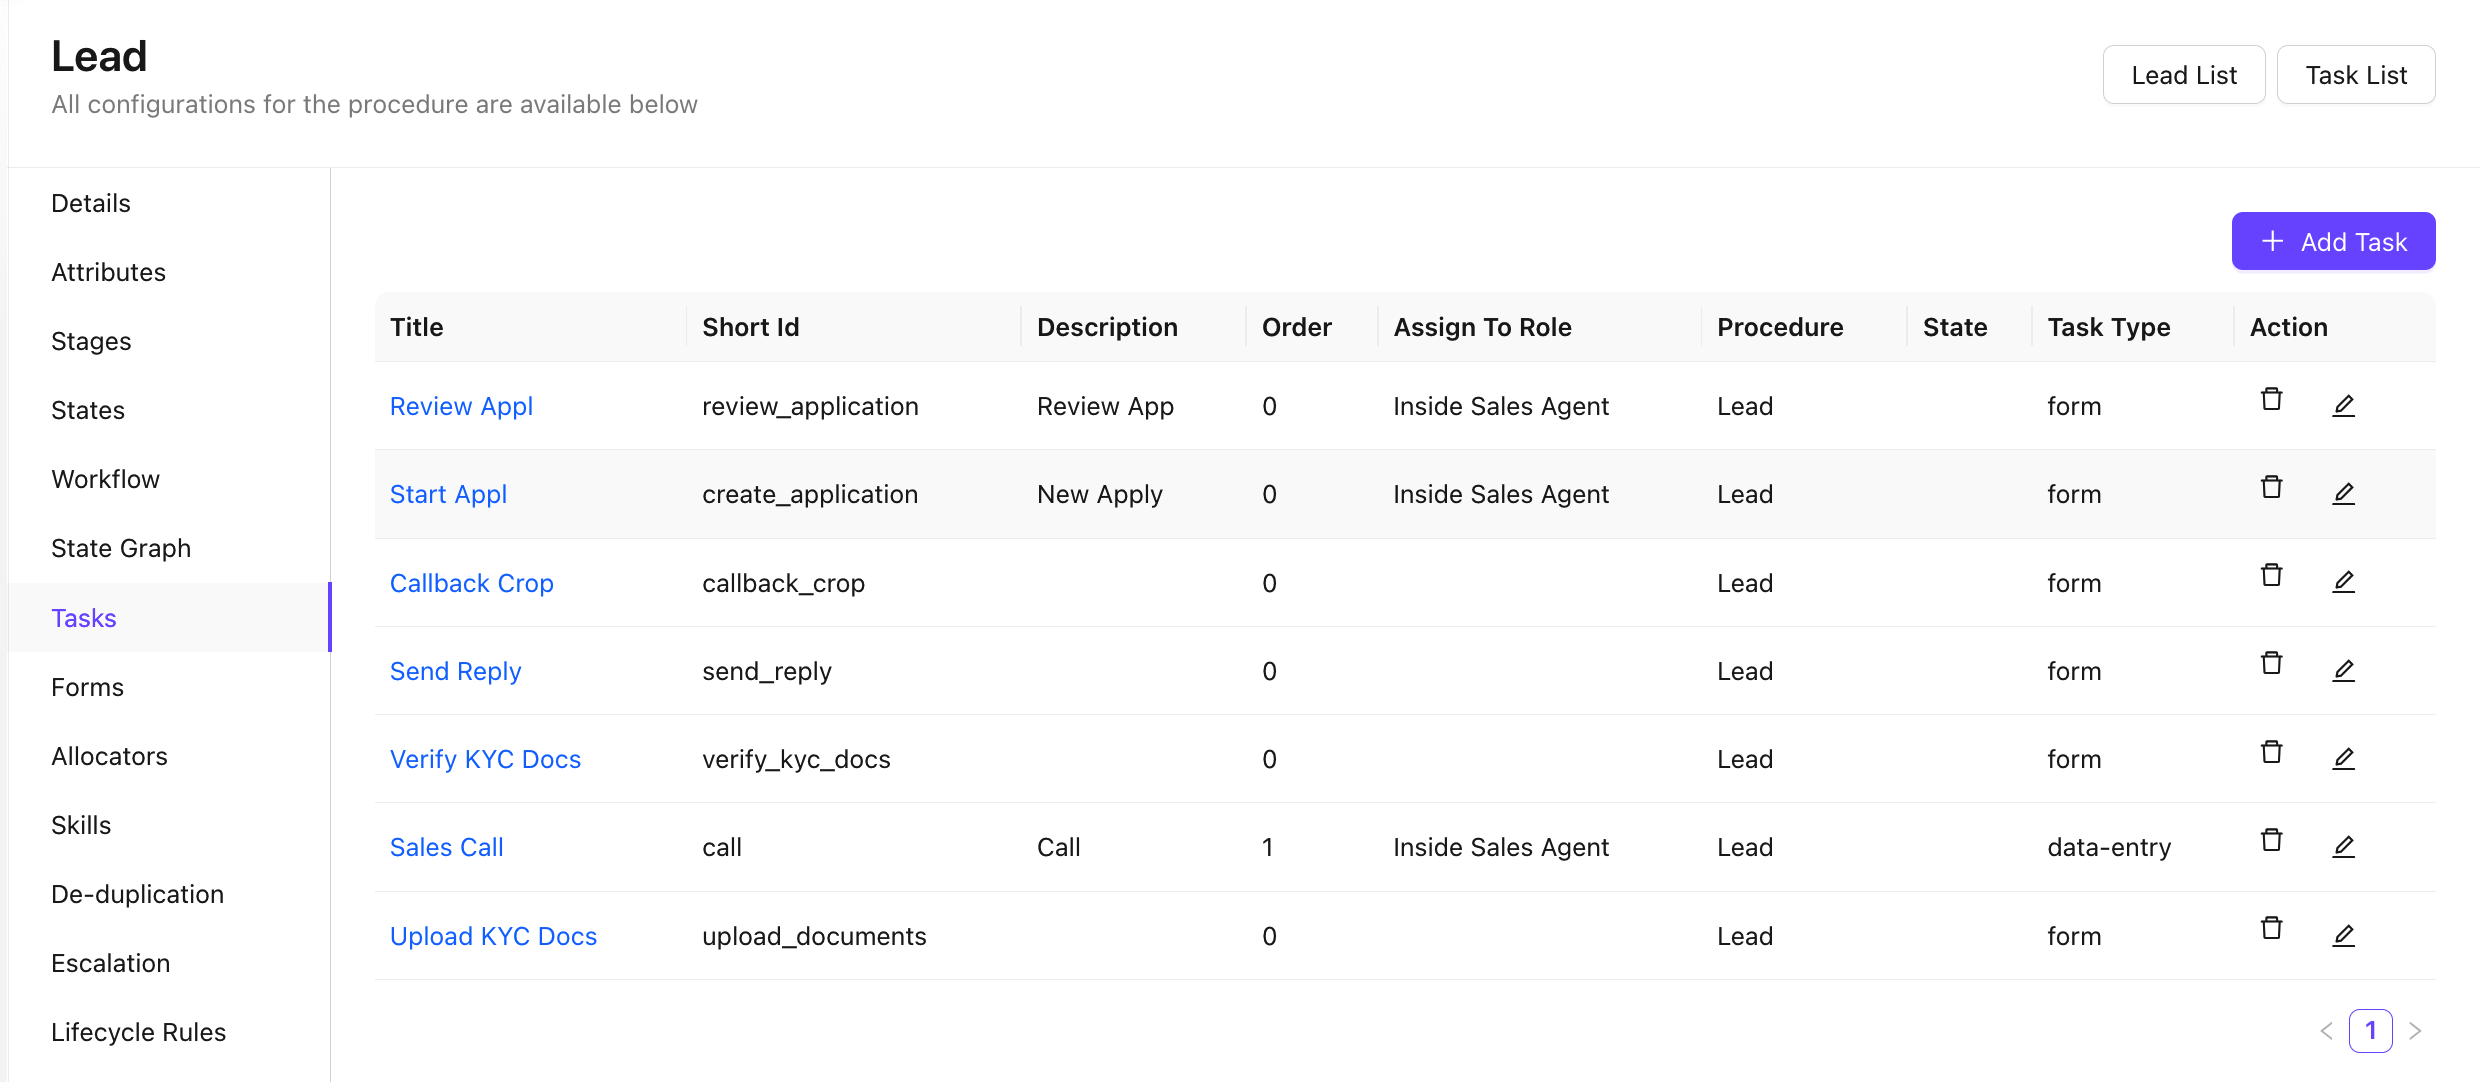
- Edit and delete existing tasks, and manage the complete task list configuration.
- Link tasks to specific lead states or workflow transitions to trigger them automatically.
- Track task completion status, due dates, and ownership from within the lead record.
Configure Tasks
Create a New Task
- Click on
➕ Add Taskbutton - Add the details in Task Creation Form
- Task
Title Short Id- Task
Attributes Stateswhere this Task will be shown- Order
- Task
Manage Tasks
- Track the Tasks in the Task list
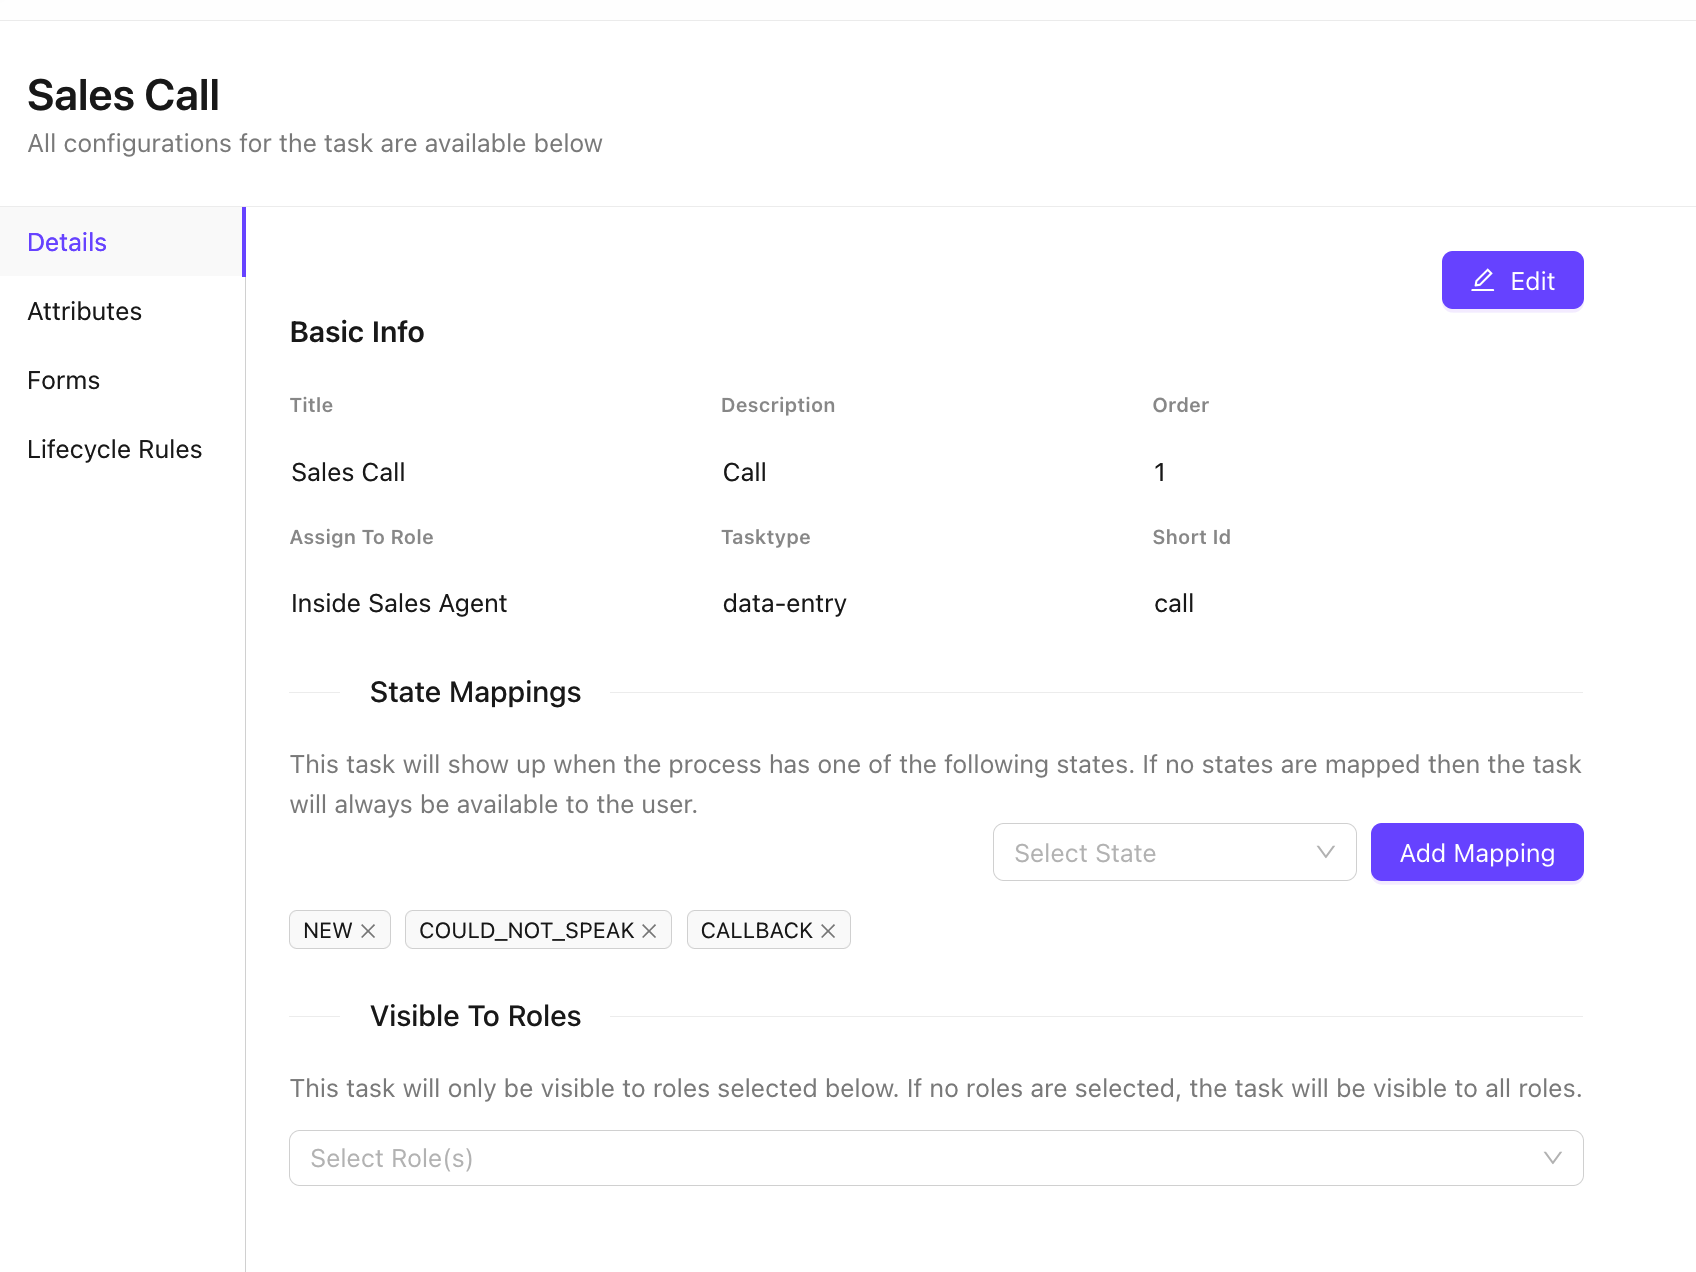
- To edit any task configuration, click on the Title of the relevant task row
- Configure tasks in Task configuration details
- Details
- Attributes
- Forms
- Lifecycle Rules
8. Forms
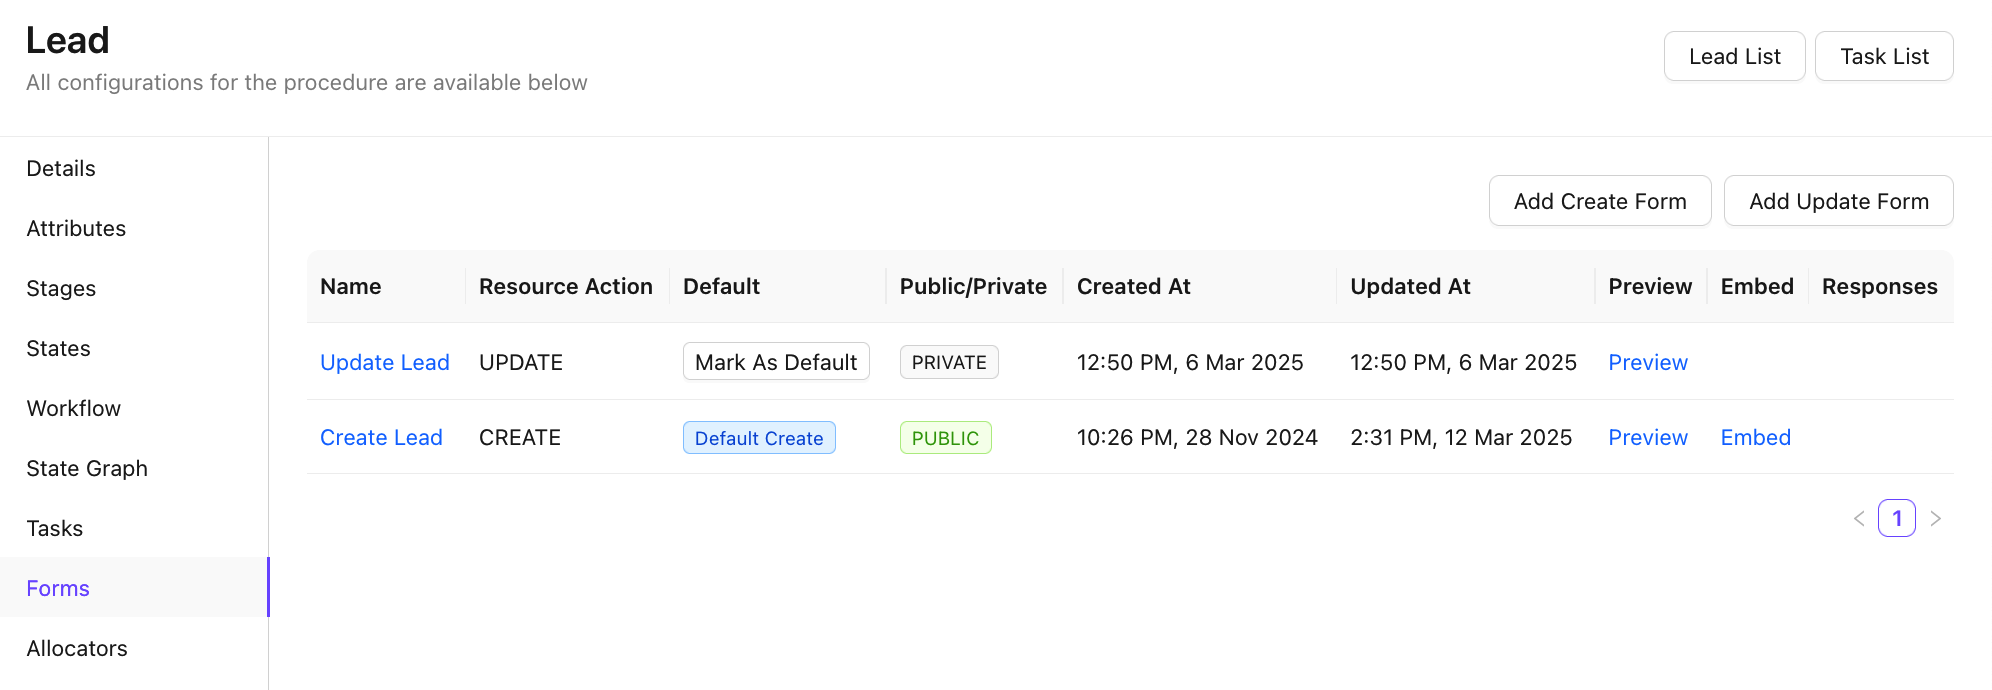
Forms allow you to capture lead information through structured, shareable data entry interfaces. These can be embedded on websites, shared publicly, or used internally for consistent data collection.
- By Default a Create and Update forms are added in the lead setup
- Create Lead Form - This form is used to create new leads
- Update Lead Form - This form is used to update existing leads
- Preview forms before publishing to verify layout and field configuration.
- Embed forms into external websites using a generated snippet.
- Make forms publicly accessible via a shareable link for inbound lead capture.
- Mark a form as the default form for new lead creation within the CRM.
9. Allocators
Allocators control how incoming leads are automatically assigned or distribtued to sales representatives. This ensures fair distribution and intelligent routing based on defined rules.
Basic Configuration Steps
1) Create an allocator
While creating an allocator you need to specify 1 or more user roles. The allocator will try to allocate leads to available users of these roles
The allocator will also show the list of available users in the users tab which belong to the configured roles
2) Configure Process Filters - define which leads are to be auto-allocated
You can configure multiple allocator for different types of leads with different allocator strategies
So first you must define the filters/conditions for finding the leads which are to be allocated under "Conditions" tab as shown below
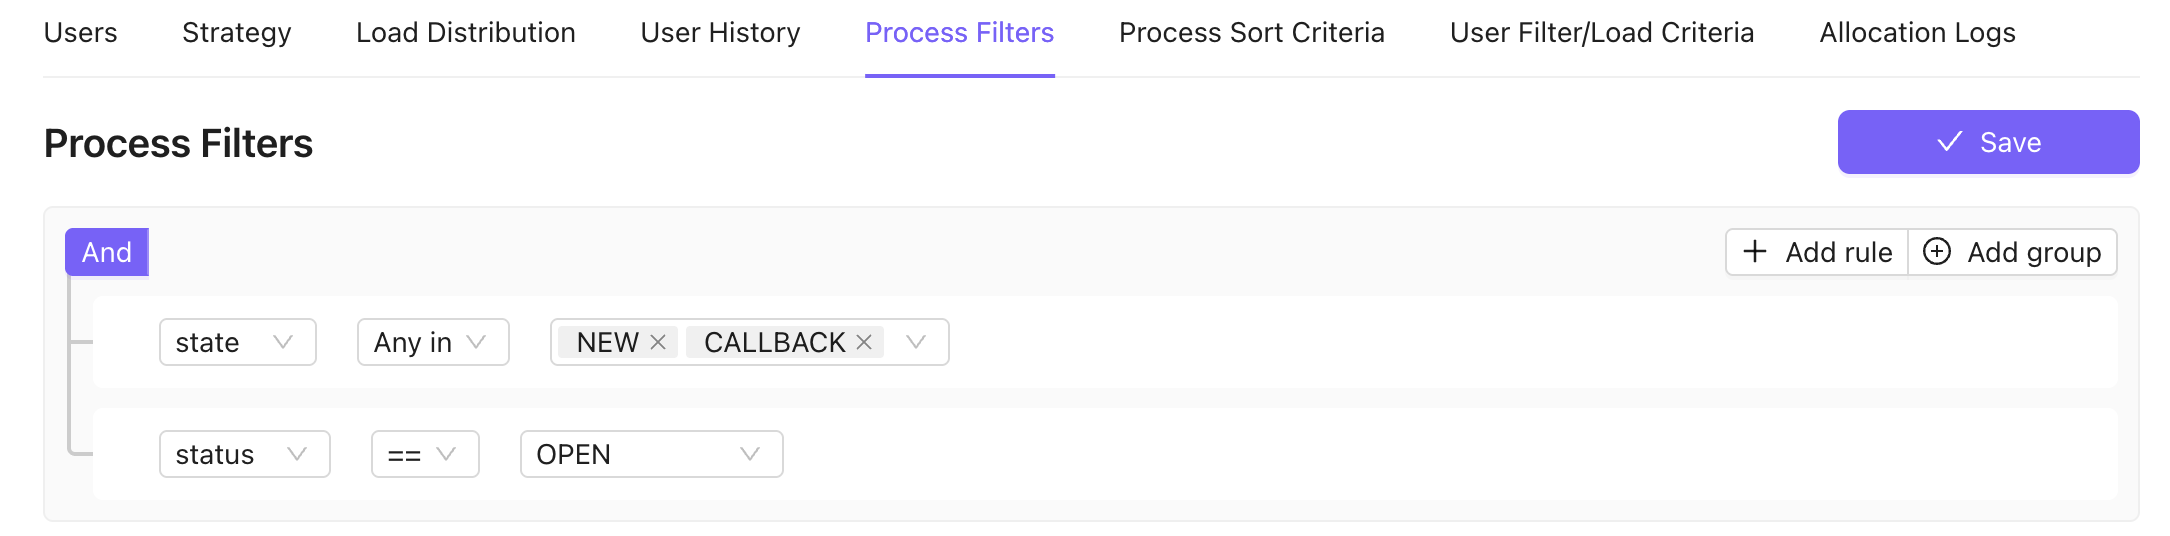
If left empty - the allocator will pick all leads with the status Open and unassigned - please note that you also cannot override these filters. It is not possible to allocate leads which are closed/cancelled or have been assigned to a user.
3) Strategy
Next you can also configure the allocation strategy from the "Strategy" tab. You can configure a primary allocation strategy and any number of fallback allocation strategies.
If the conditions supplied for the primary strategy do not match a particular lead then the allocator will try to use the next fallback strategy. If the conditions for the fallback strategy do not match, then it will look for the next strategy until it finds an applicable strategy.
Skills are an important part of how allocation works. If leads have been configured to have certain skill mappings, then allocator tries to match the skills needed by a lead to the skills available for a user. This matching criteria works by default across all strategy types. You can choose to have no skill mappings for leads too.
There are 3 basic ways to customize a strategy
A) Strategy type
- Round Robin - this is the default strategy type and basically means that leads are allocated to on applicable user after another without any bias
- Lead balanced - Using this strategy, the allocator tries to find users with the least amount of load (load criteria is defined in the "User Filter/Load Criteria" tab. This strategy is useful where you want the fastest resolution per assigned lead meant for high velocity sales. You can configure the max load for a user in the users tab
- Weighted Round Robin - This is similar to Round Robin except, the distribution is weighted according to the weights supplied in hte Users tab. so if a user has a weight 2, then it will be assigned twice the leads compared to the user with a weight of 1
B) Whitelisted Skill types
- If you want an allcoator to only honour a specific skill or skills, You can configure this optional input
C) Conditions
- Configure the lead filters/conditions which should match for a lead to be eligible for this strategy
4) Users
You can manage the users who are to be allocated leads from the Users tab. By default only users with availability status AVAILABLE are allocated leads. However you can manually exclude certain users by marking them as In active
You can als configure the max load and weight parameters for users form this dashboard. These paramters are useful in the allocation strategies described earlier
You can also quickly see which user are available, their current load from this dashboard
Advanced Configuration Options
1) Lead sorting
You can configure in which order leads are considered for allocation from the "Process Sort Crtieria" tab. You can configure multiple dimensions here and specify the sorting order per dimension
2) User Roles
You can modify the user roles which govern which users are considered by an allocator from the "User Filter/Load Criteria" tab
3) Load Criteria
By default for load balanced allocation strategy, leads are assigned to users with the least amount of load. Load criteria by default is the number of open leads a user is assigned to. However, you can modify this crtieria from the "User Filter/Load Criteria" tab
A common pattern for defining load criteria is to define load by lead state. Lets say your sales representative is tasked to take a NEW lead and convert its state to QUALIFIED or UNQUALIFIED. So all NEW state leads assigned to a user constitutes his/her load. So your load criteria in this case should be all leads with state NEW.
Monitoring
Certain dashboards are provided for you to monitor the performance and history of an allocator
- Users Tab - This gives you a birds eye view of your team showing which users are available and their current load.
- Allocation Logs - This give you a history of whenever a lead was allocated. You can check which lead was assigned to whom and at what time
- Load Distribution - Breaks the unallocated load by required skills and other parameters
- User History - This gives the history of the users' availability
10. Skills
The Skills feature enables intelligent lead routing based on a sales representative's expertise, product knowledge, or qualifications - going beyond simple round-robin or geographic assignment.
- Define skills relevant to your business (e.g., Enterprise Sales, Regional Language, Product Expertise).
- Assign one or more skills to each sales representative based on their capabilities.
- Tag incoming leads with required skills so the system matches them to the most qualified agent.
- Combine skills-based routing with load balancing to ensure both quality and efficiency in assignments.
Skill Feature Configuration
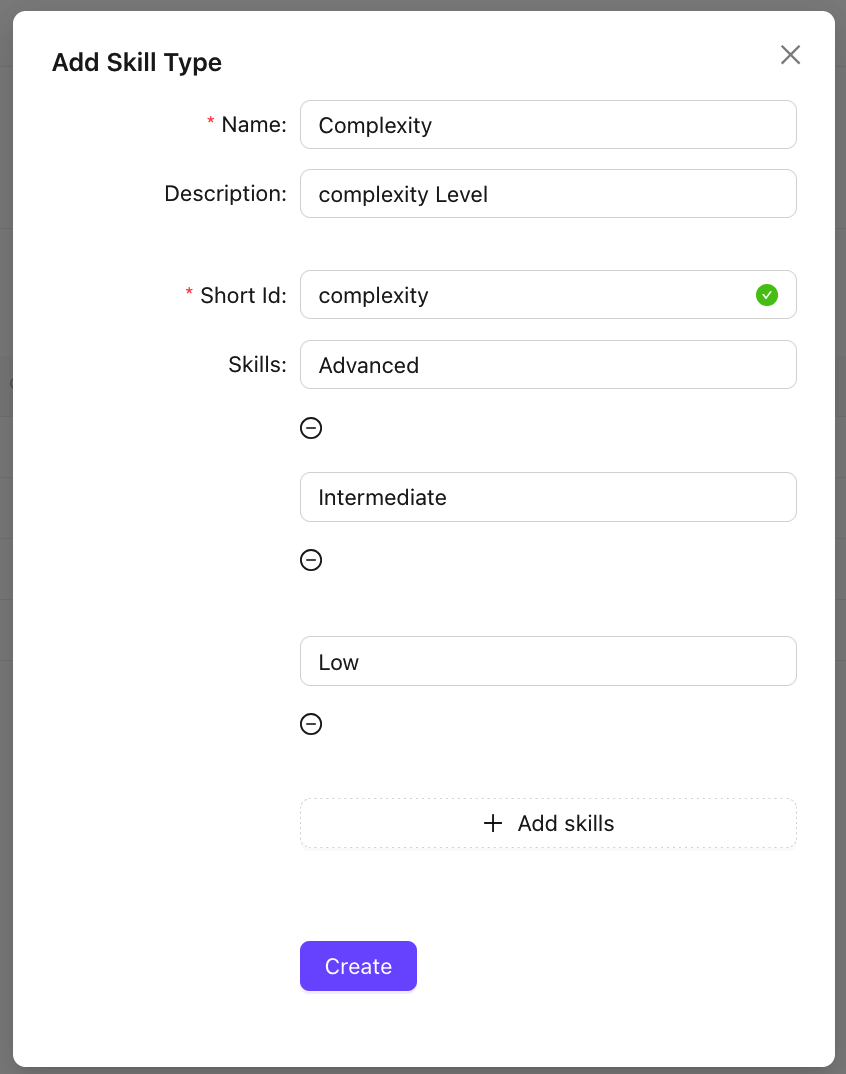
Add New SkillType
- Click on
⊕ Add SkillType - Update the SkillType form with (Name, Description & ShortId)
- Add
Skills
Configure SkillType
- Expand a SkillType to be updated using the
+
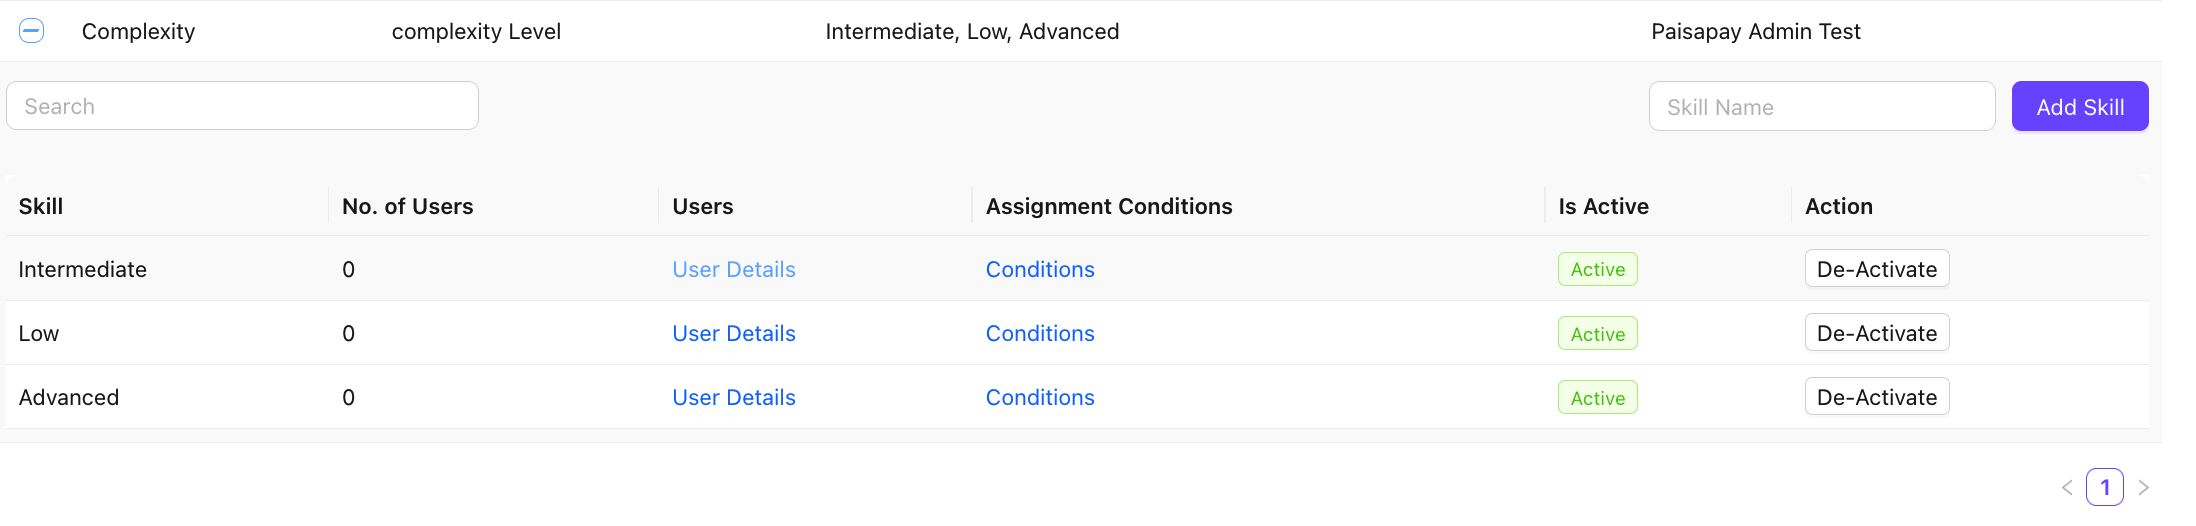
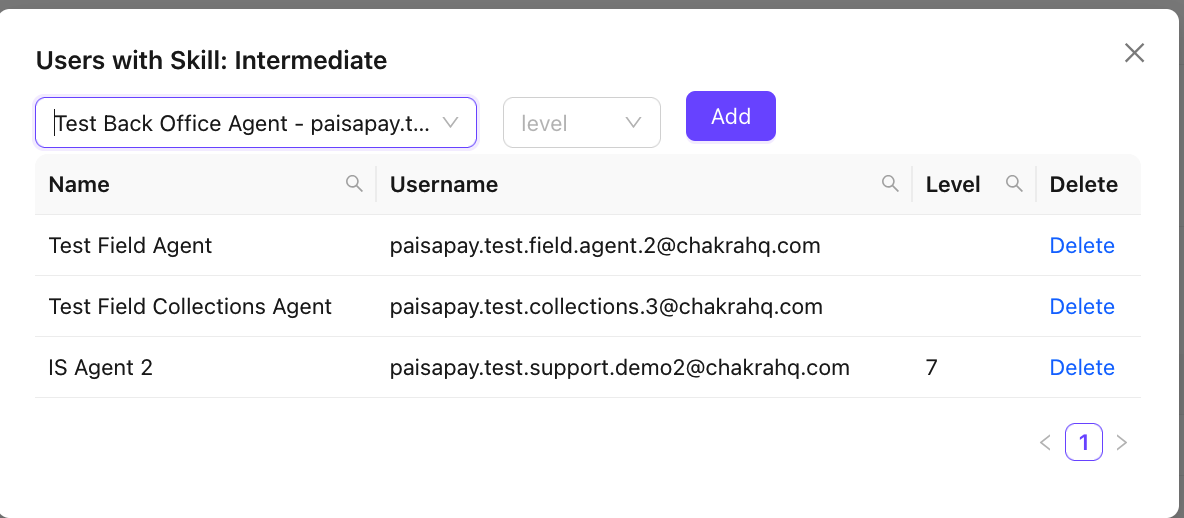
- Add Users to a Skill in the SkillType by clicking on User Details in Users column
- Choose the
new user(s)from the dropdown. - Add a Skill
level[optional] - Click
Add
- Choose the
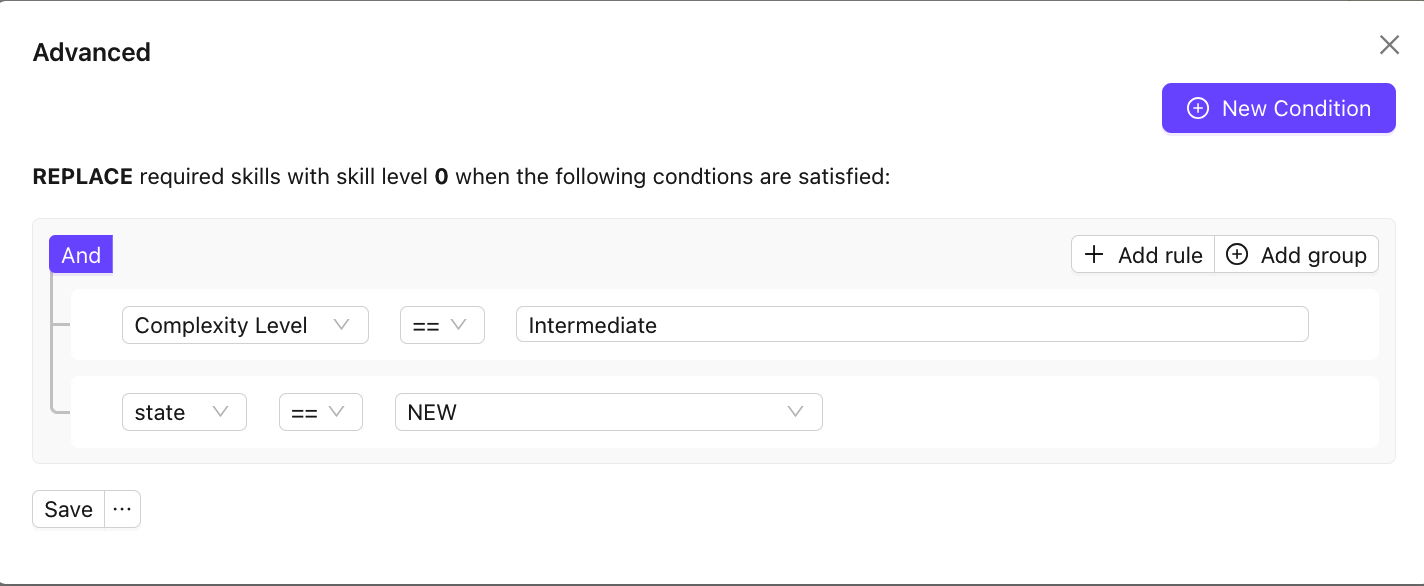
- Add Conditions for assignment
- Click on Conditions in the Assignment Conditions column
- Click on
⊕ New Condition - Add the Rules with conditions
- Choose the SkillTpye Field to be mapped to this skill
11. De-duplication
Lead de-duplication identifies and resolves duplicate lead records in the CRM, keeping your data clean and preventing multiple agents from working the same lead unknowingly.
- Define matching criteria (e.g., phone number, email, name combination) to detect duplicates.
- Choose to merge duplicate leads, retaining the most complete or most recent record.
- Set rules for what happens when a duplicate lead is submitted via a form or API - block, merge, or notify.
- Review a de-duplication log to audit resolved records and track data quality improvements.
Configure Deduplication Settings
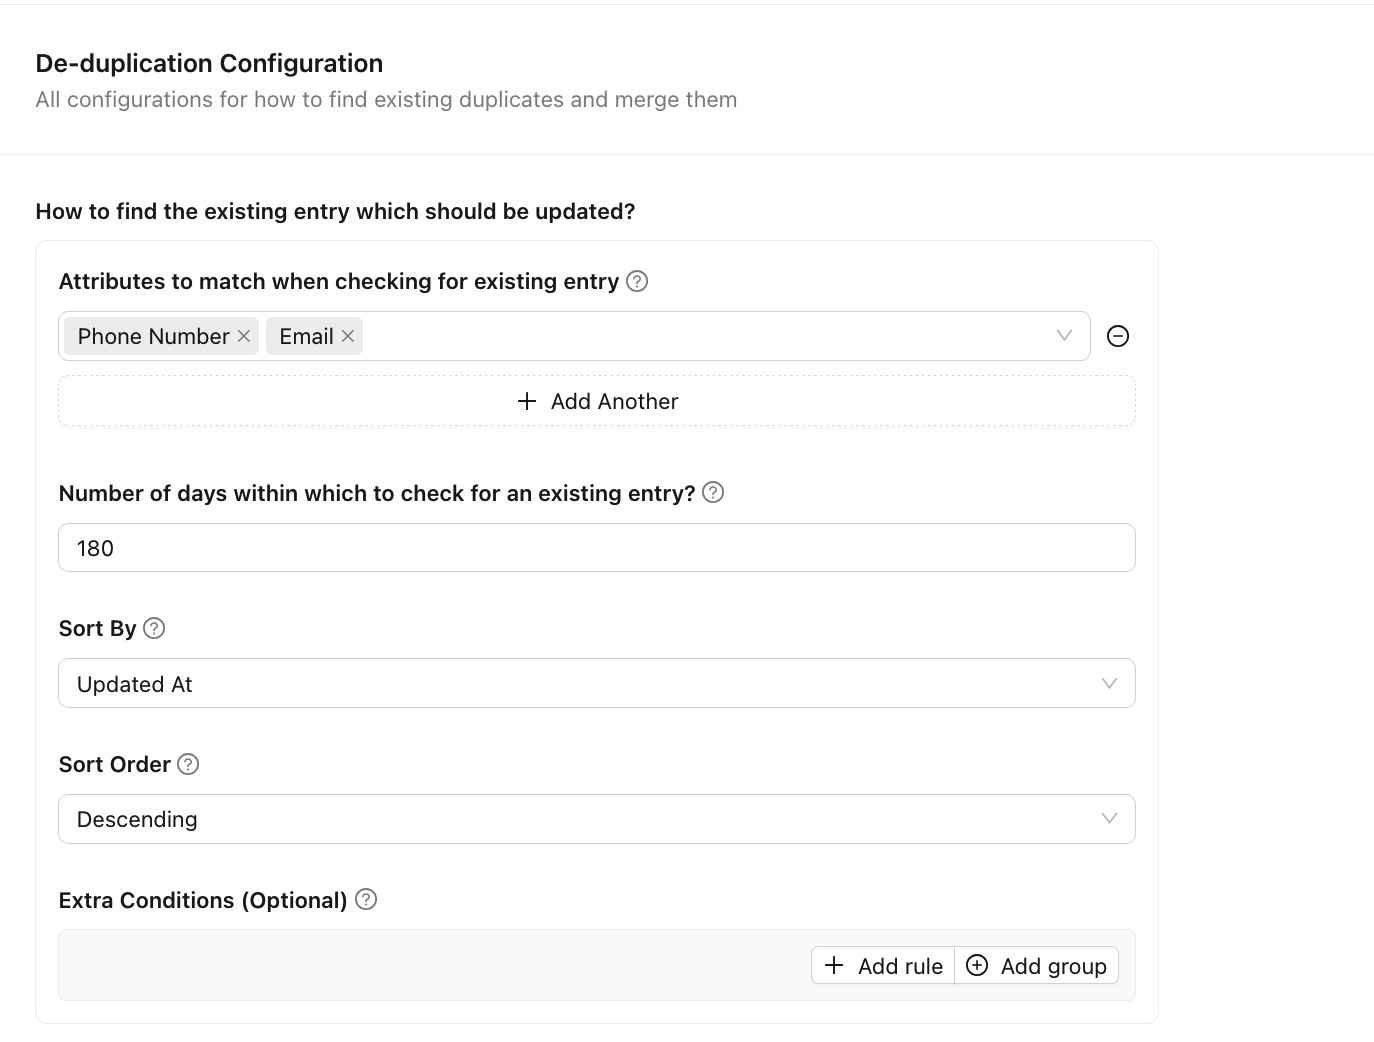
Configure Duplicate Lead Identify Conditions
- Attributes to match when checking for existing entry (An entry where all the listed attributes have the same value will be matched). Both And / OR conditions
- Number of days within which to check for an existing entry (The number of days within which to check for an existing entry)
- Sort By: If multiple entries match the unique attributes criteria, we pick the first entry after sorting.
- Sort Order: If multiple entries match the unique attributes criteria, we pick the first entry after sorting.
- Extra Conditions (Optional): Any extra condition added here will also need to be satisfied by the matching entry.
Configure Duplicate Lead Action Conditions
- Add Action(s)
- Order
- Type of check to assert that this action must be run (How to check if this action should be run?)
- The conditions to check (Optional)
- Type of the action (What type of action is this?)
- Create a new entry
- Update the existing entry
- Update the existing entry and override all fields
- Action parameters (Parameters to use when running this action?)
- Overrides
- Attributes override (Optional) (Which attributes should be copied from the new entry to the merged entry)
- Status override (Optional)
- State override (Optional)
- Assignee override (Optional)
- Booking override (Optional)
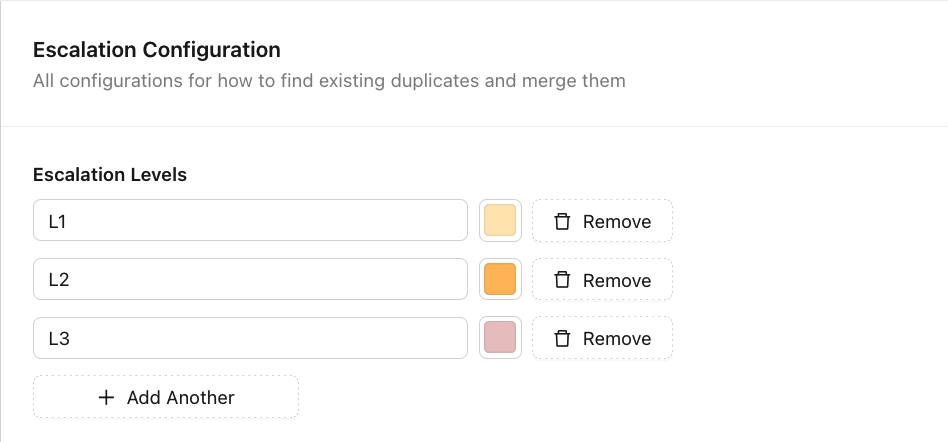
12. Escalation
Escalation Management ensures that leads which are stalled, unattended, or breaching SLAs are automatically flagged and routed to supervisors or alternate assignees.
- Set escalation triggers based on time elapsed in a state, inactivity period, or SLA breach.
- Define escalation paths – specify who the lead is escalated to and in what sequence.
- Configure escalation notifications to alert managers or team leads when a lead is escalated.
- Use escalation rules to enforce accountability and reduce drop-offs in the sales pipeline.
Add Escalation Levels
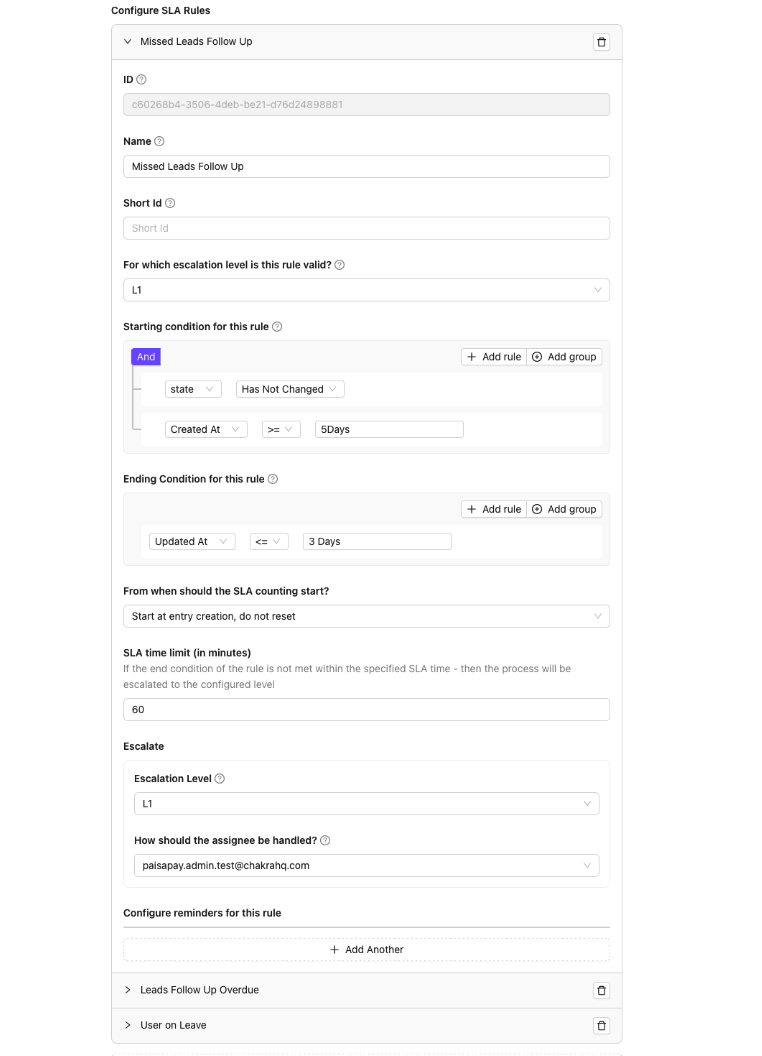
Configure SLA Rules
- Name (Provide a name for the rule)
- Short Id (Unique ShortId for the rule. eg: closure_sla)
- For which escalation level is this rule valid? (For which current escalation level is the rule valid?)
- Starting condition for this rule (Trigger this rule if the following conditions are met)
- Ending Condition for this rule (End this rule if the following conditions are met)
13. Lifecycle Rules
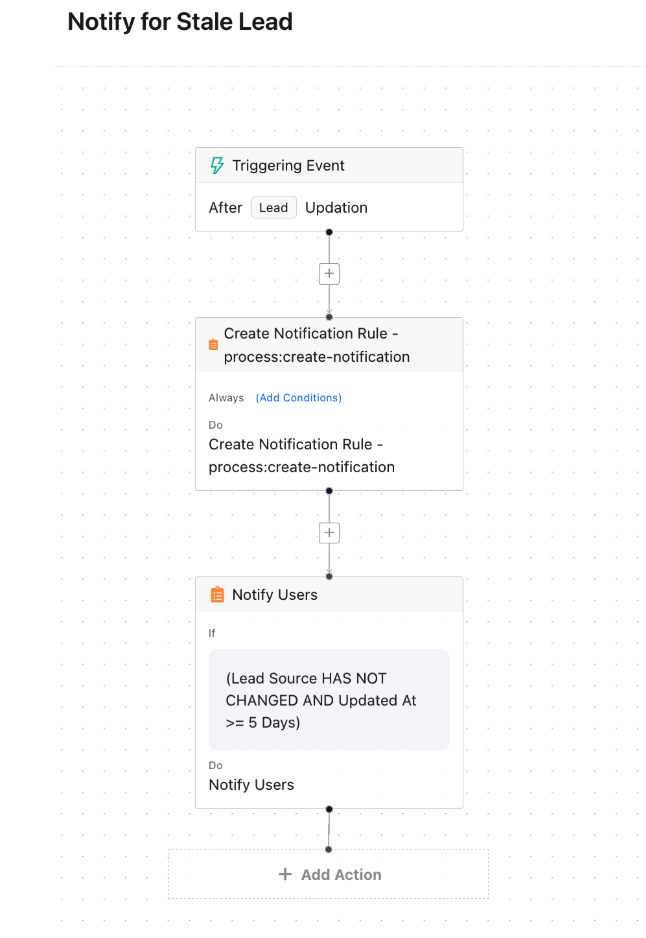
Lifecycle Rules allow you to automate actions on leads using a trigger–condition–action framework, reducing manual effort and ensuring consistent process execution.
- Triggers: Events that initiate the rule, such as lead creation, state change, field update, or time elapsed.
- Conditions: Filters that must be satisfied for the rule to execute (e.g., lead source = 'Web', assigned city = 'Mumbai').
- Actions: Automated outcomes such as changing lead state, sending a notification, assigning to a user, or updating a field.
- Chain multiple conditions and actions within a single rule for complex automation scenarios.
- Use lifecycle rules to automate nurture flows, re-engagement triggers, and SLA-based reminders.
Configure Lifecycle Rules
Lifecycle Rule List
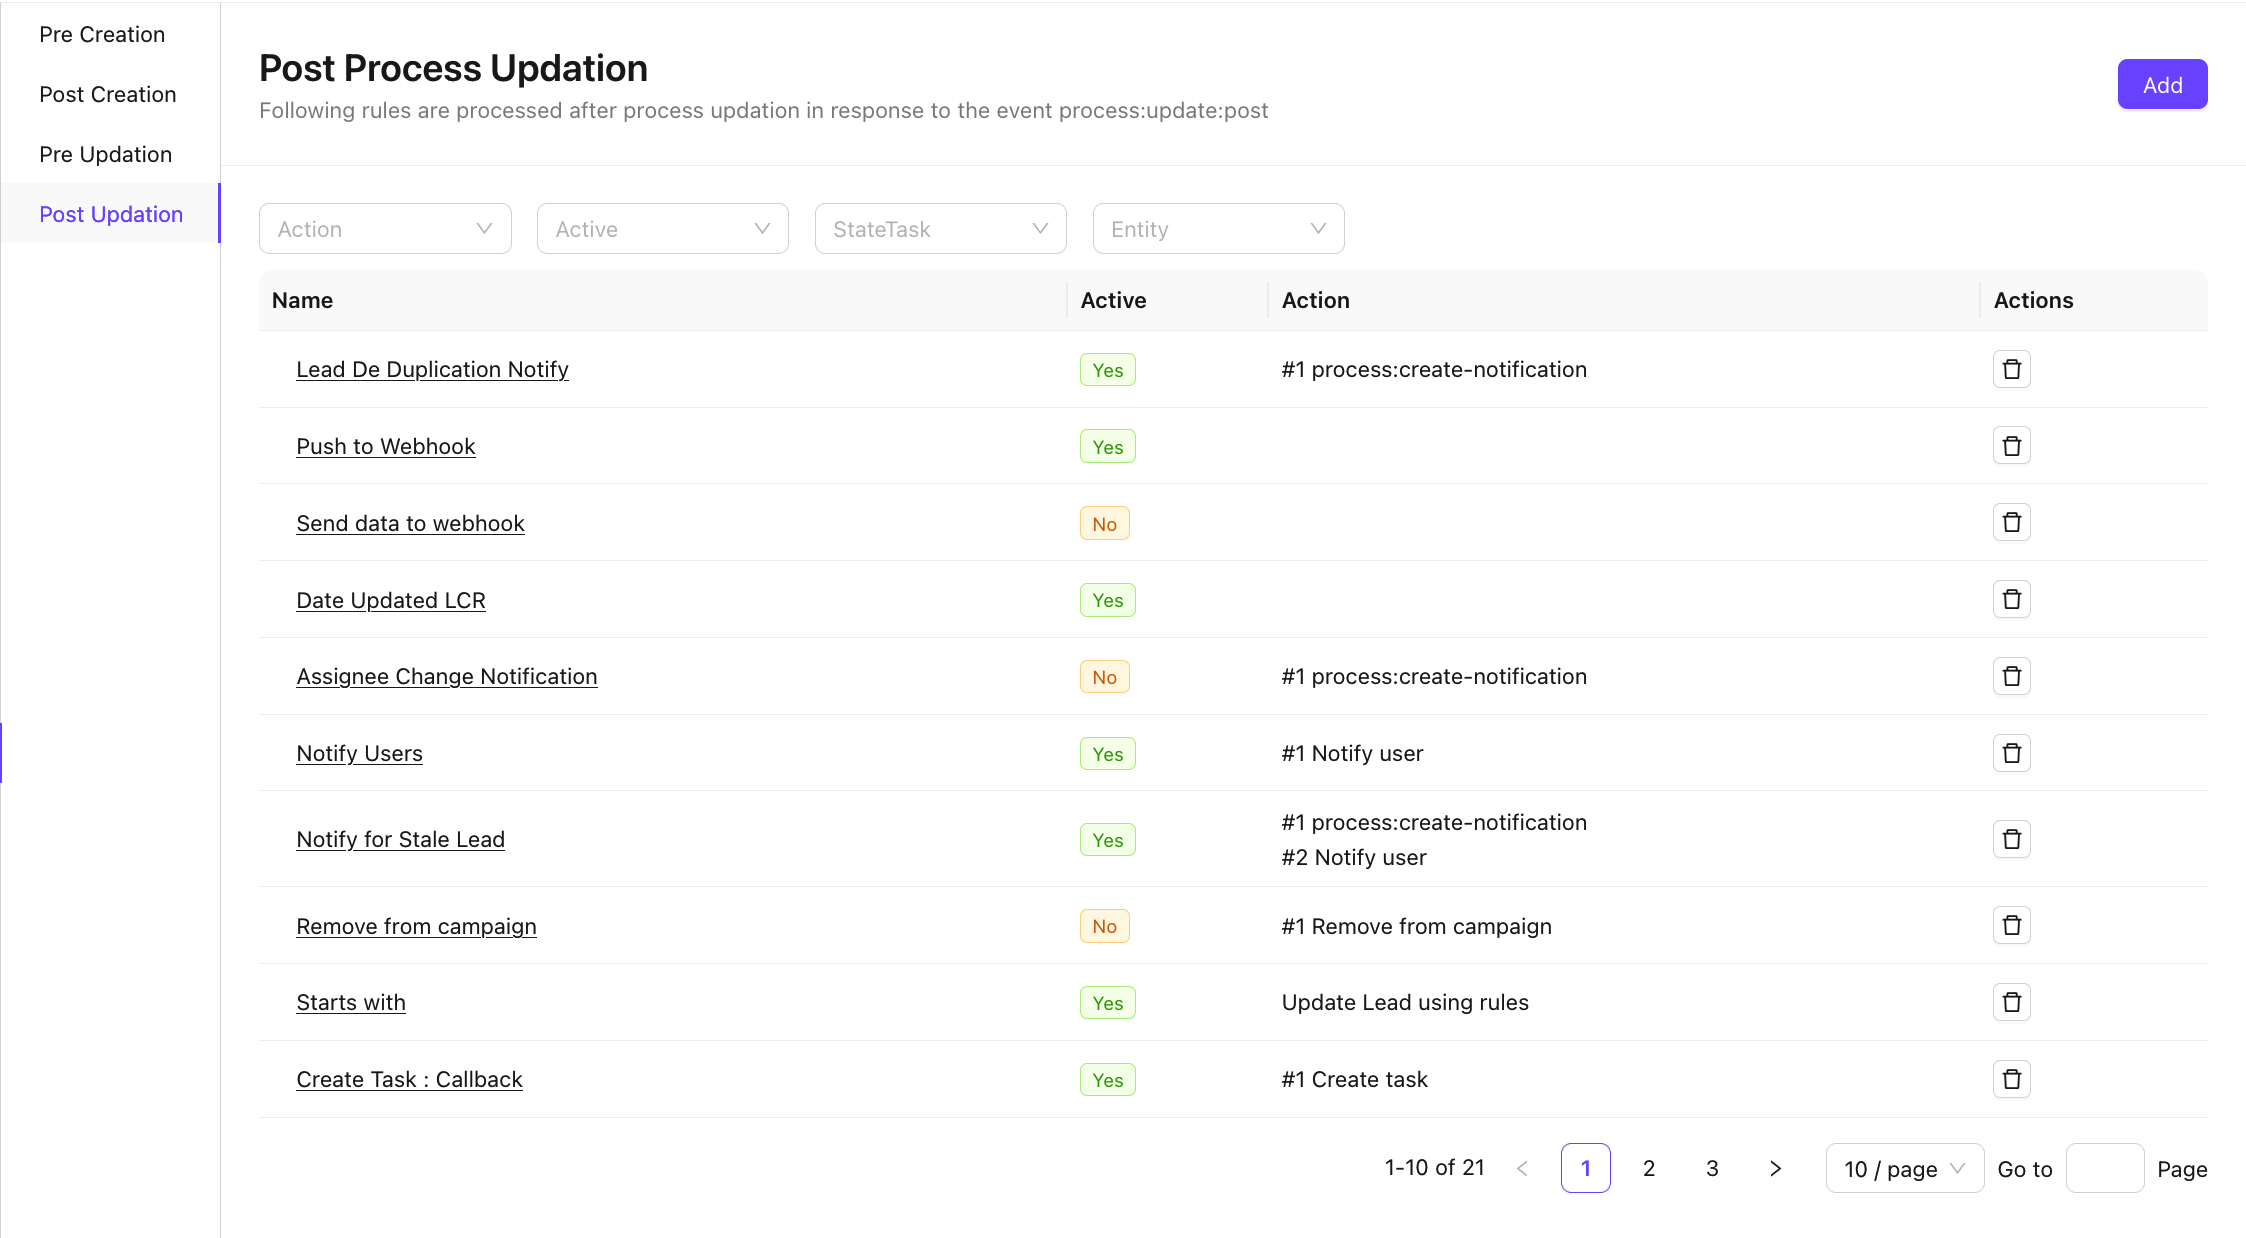
Type of Lifecycle Rules
- Pre Creation
- Post Creation
- Pre Updation
- Post Updation
Configure Lifecycle Rules Builder
- Trigger
- Trigger Conditions [optional]
- Action
14. Notifications
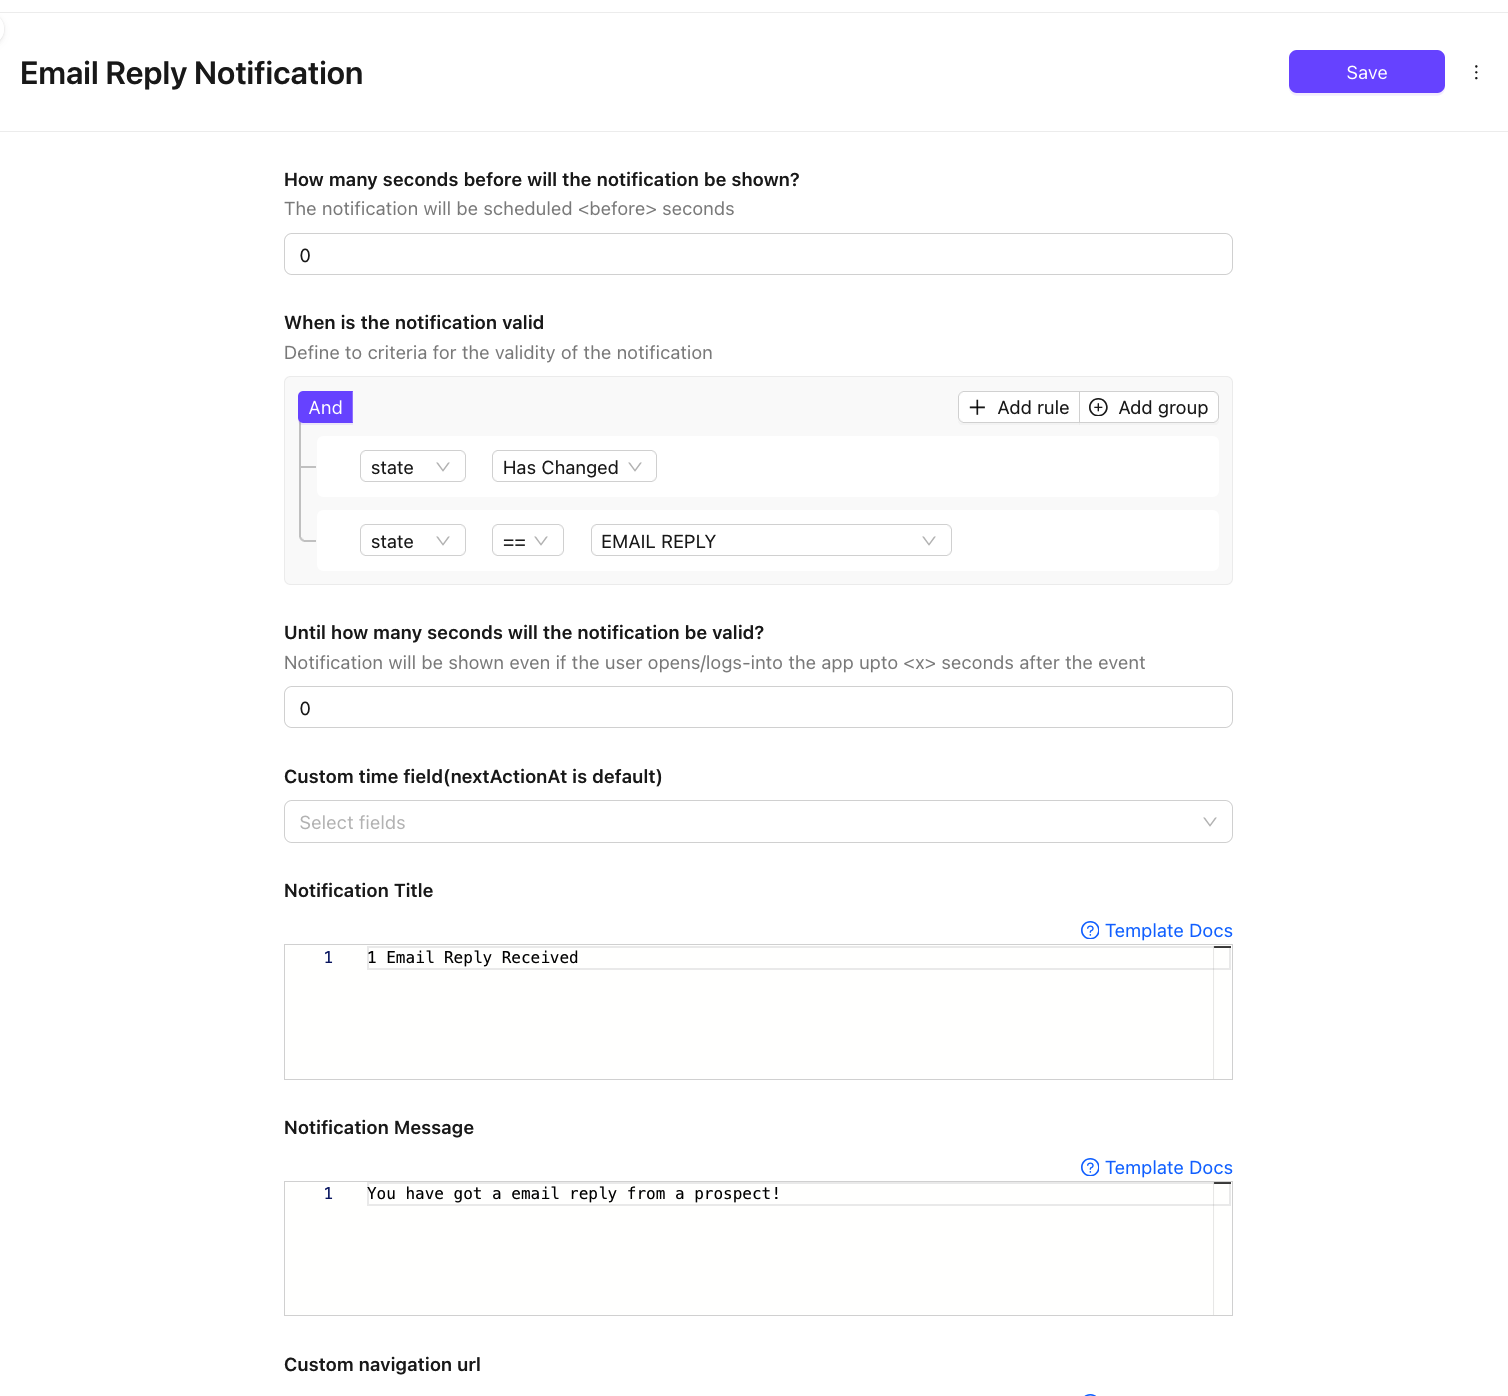
Notifications keep your team informed of important lead events in real time. Custom notifications can be configured for specific actions, state changes, or updates within the lead lifecycle.
- Enable notifications for events such as lead assignment, state change, task due, or escalation.
- Target notifications to specific roles, teams, or individual users.
- Configure delivery channels – in-app alerts, email, or SMS depending on your integrations.
- Customize notification templates with dynamic placeholders for lead-specific information.
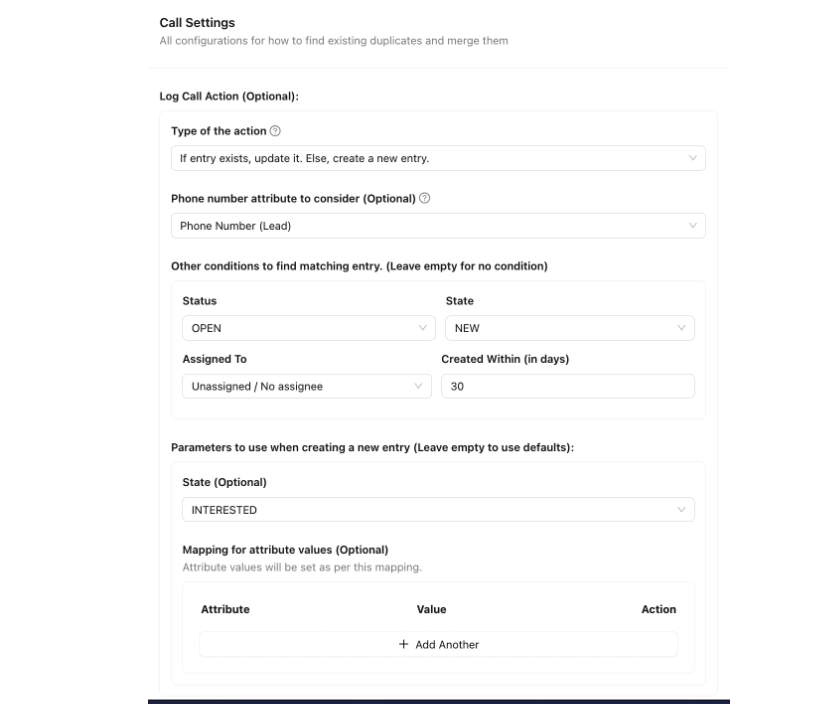
15. Call Settings
Call Settings integrate telephony capabilities directly into the lead management process, enabling click-to-call, call logging, and automated lead actions based on call outcomes.
- Configure integration with cloud telephony or VoIP providers.
- Set rules for automatic lead creation when a new inbound call is received from an unknown number.
- Enable call merging logic to associate calls from existing numbers with the correct lead record.
- Define post-call update rules – automatically update lead state or schedule follow-up tasks based on call disposition.
- Manage call recording settings and access permissions.
16. Campaigns
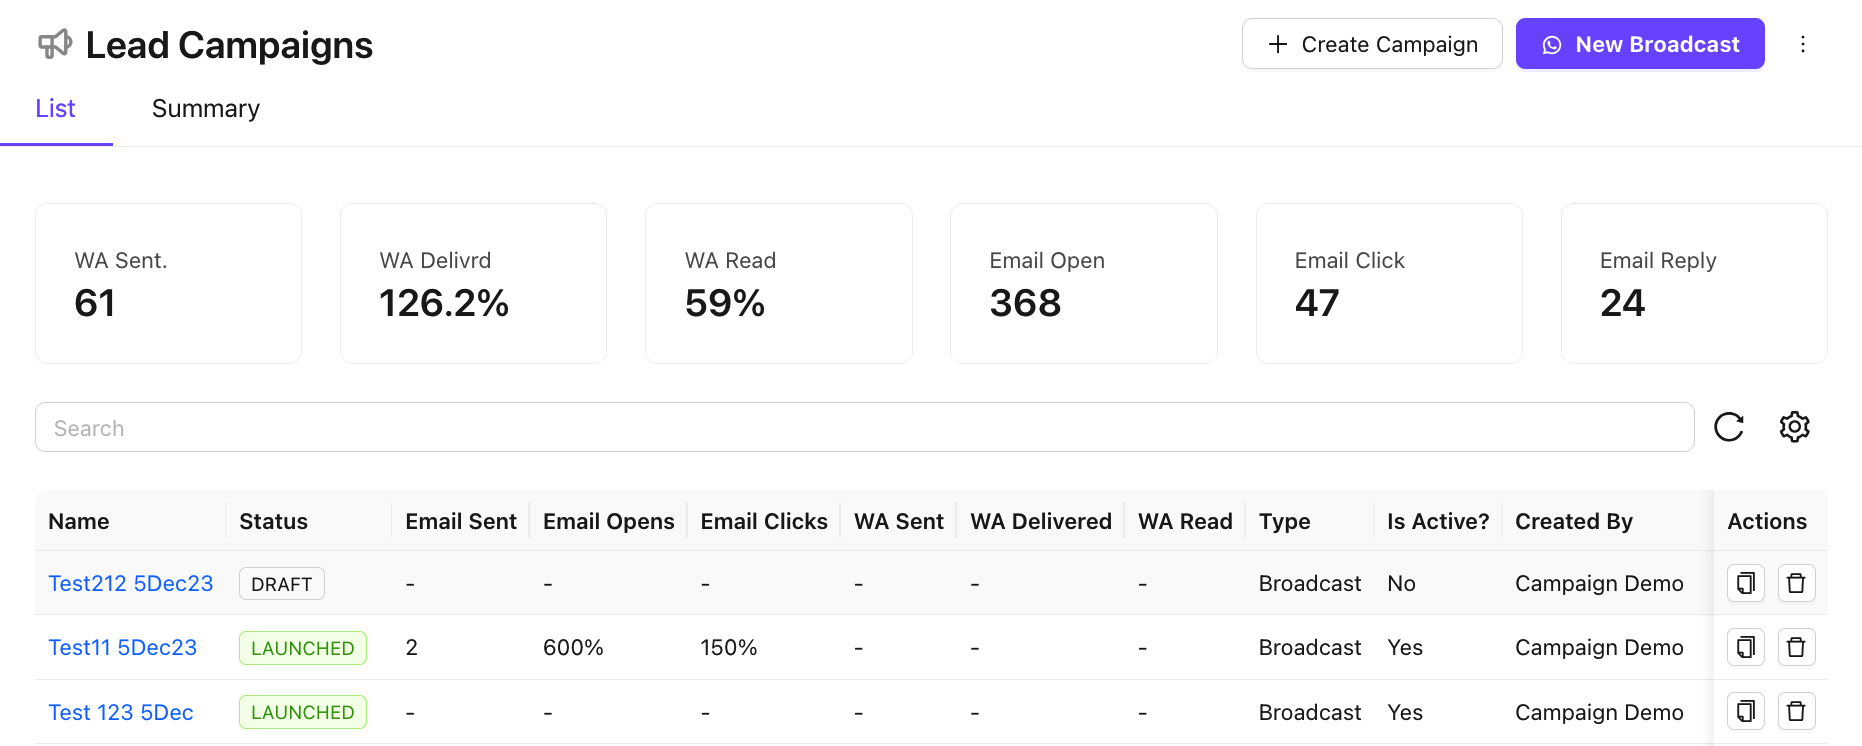
Campaigns allow you to run targeted marketing or re-engagement outreach to leads across SMS, Email, and WhatsApp channels - all linked directly to your lead data.
- View the Campaign Dashboard for a consolidated overview of all active and past campaigns.
- Create new campaigns as either Workflow campaigns (sequence-based, automated) or Broadcast campaigns (one-time, bulk sends).
- Set targeting criteria using lead attributes, state, stage, or custom filters.
- Monitor campaign performance through metrics including delivery rate, open rate, click rate, and response rate.
- Access detailed delivery reports at the individual lead level to track engagement.
Manage Campaigns
Create New Campaigns
- Click on
+ Create Campaigns - Configure the Campaign
Manage Campaigns
- Search campaign using the Search Bar
- Use Campaign actions to Clone or Delete the campaign
- Track Campaign Metrics
17. Message Templates
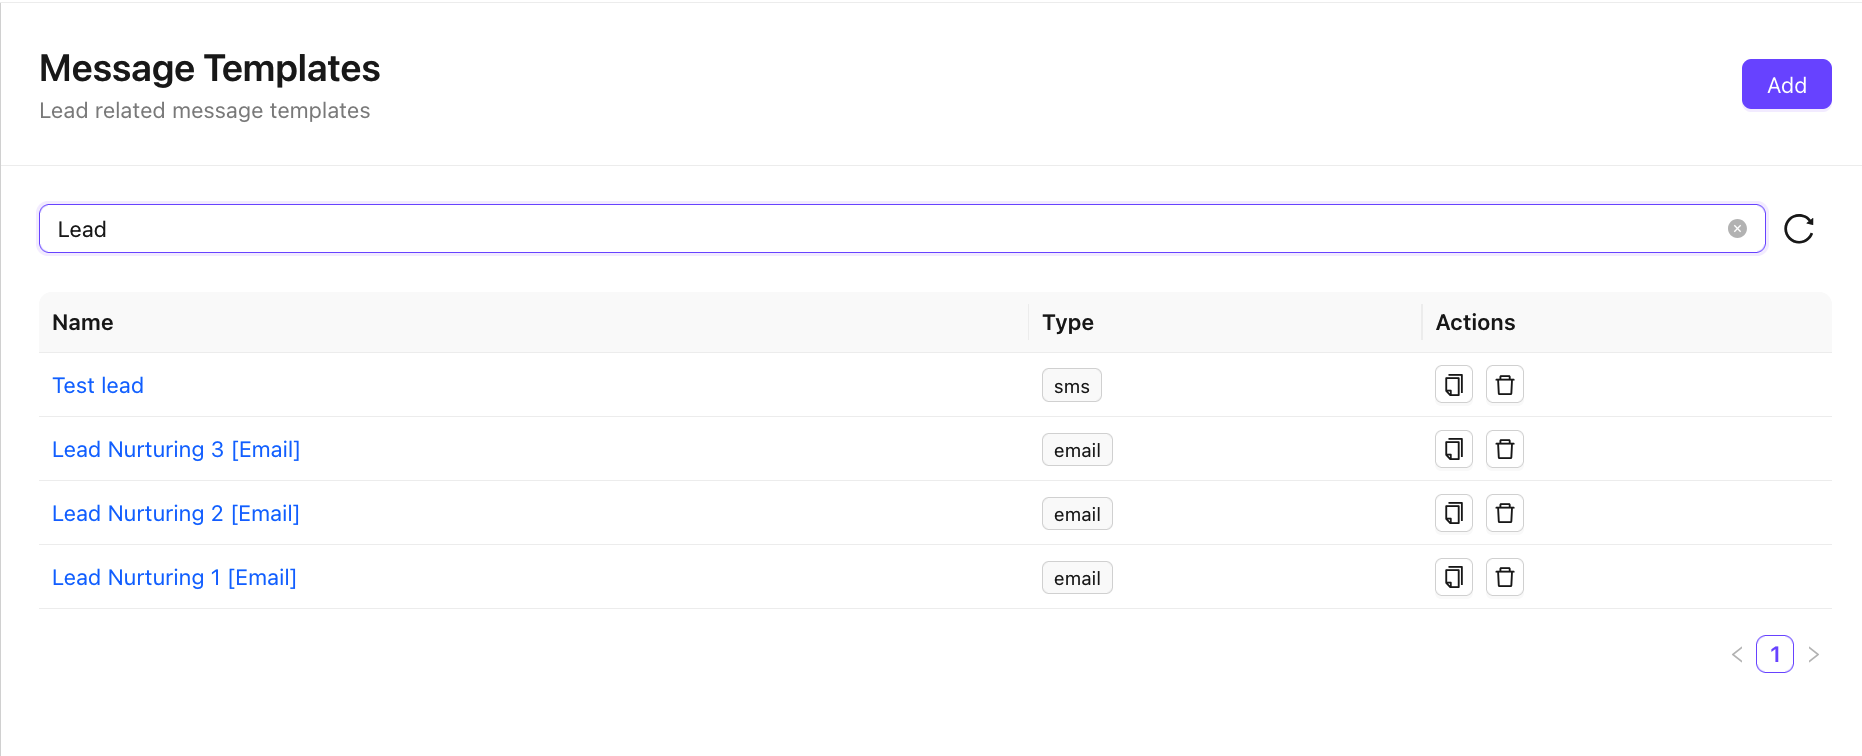
Message Templates are pre-built content templates used within Campaigns and automated notifications. They ensure consistent messaging across channels and reduce the time needed to create outreach content.
- Create templates for SMS, Email, and WhatsApp channels.
- Use dynamic placeholders (e.g., {lead_name}, {assigned_agent}) to personalize messages at scale.
- Submit WhatsApp templates for approval in line with Meta's business messaging policies.
- Organize templates by channel, category, or campaign type for easy retrieval.
Manage Templates
Create New Template
- Click on
Add - Configure the Template
- Save the Template
Access Existing Templates
- Search for the template in the Search Bar
- Use Template actions to Clone or Delete the campaign
18. Templates (Project)
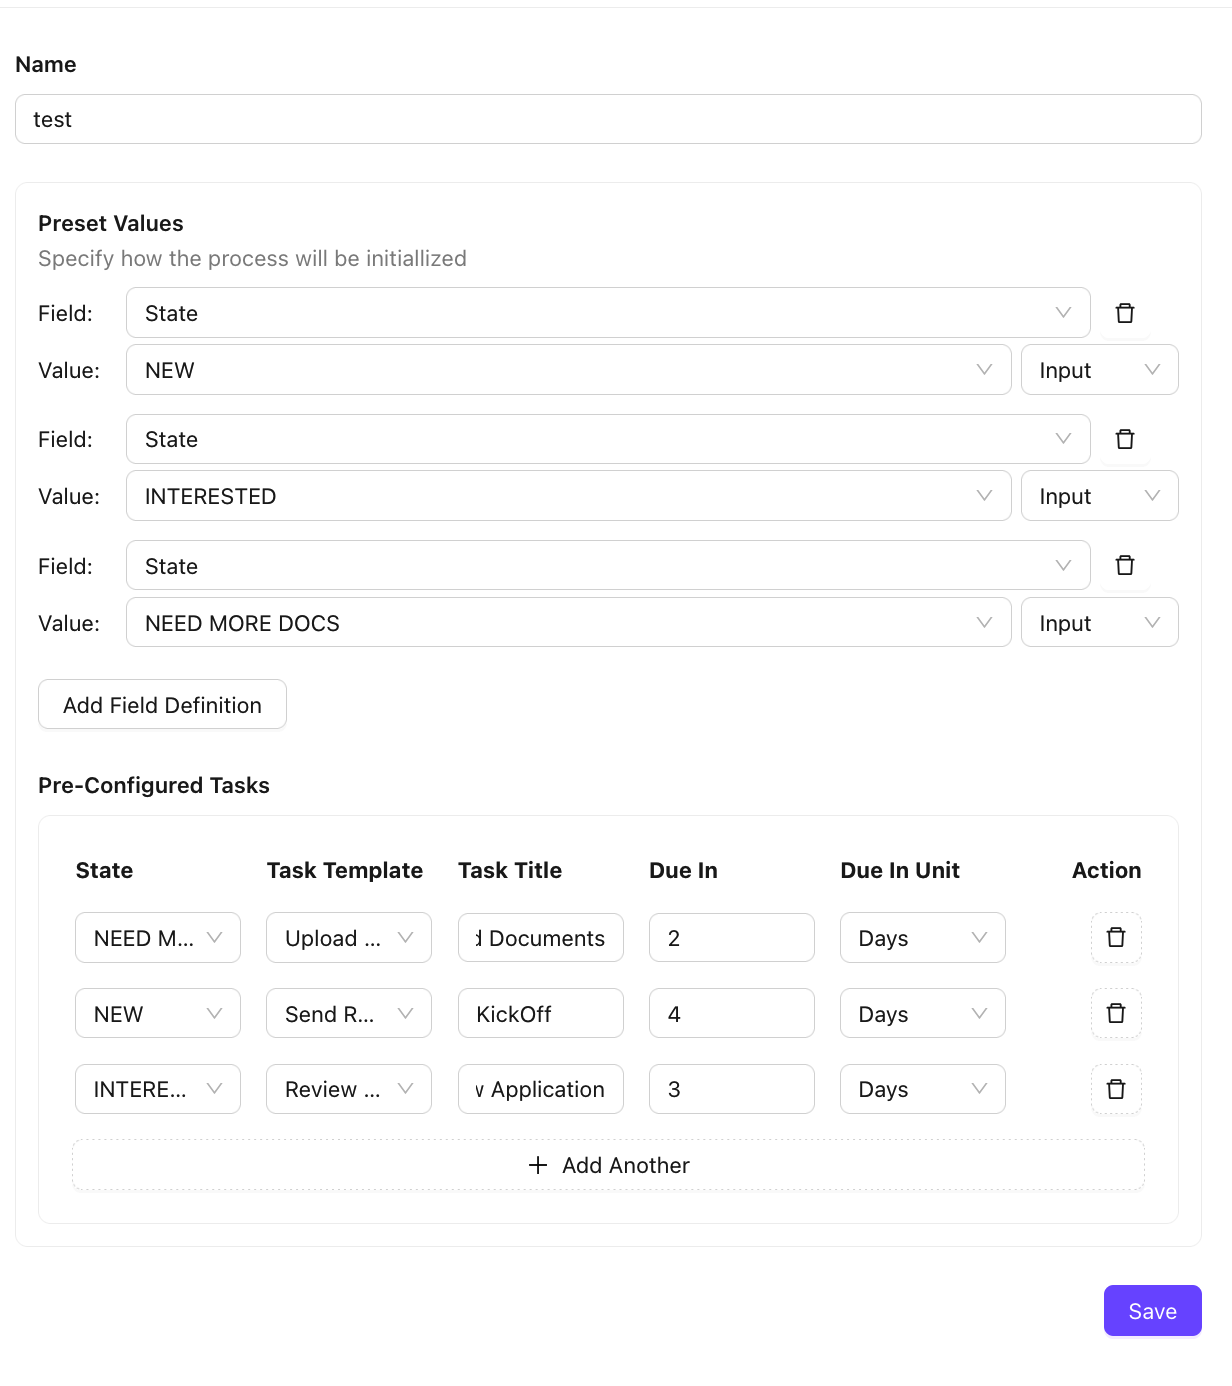
Project Templates allow you to define and associate structured project plans with leads. This is especially useful in sales processes that involve delivery or implementation after a deal is closed.
- Create reusable project templates with predefined tasks, milestones, and timelines.
- Associate a project template with a specific lead state to auto-initiate projects upon deal progression.
- Manage and update templates as your delivery process evolves.
- Provides a bridge between the sales pipeline and post-sale project execution.
19. Auto Dial Campaigns
Auto Dial Campaigns automate outbound calling to a defined list of leads using integrated cloud telephony or VoIP systems, enabling high-volume calling without manual dialing.
- Configure dialing campaigns with specific lead lists, time windows, and retry logic.
- Set the order and frequency of call attempts for unreachable leads.
- Integrate with your telephony provider to initiate calls and record outcomes automatically.
- Pause, resume, or stop campaigns without losing progress or lead state.
- Review campaign call logs and disposition summaries to measure outbound effectiveness.
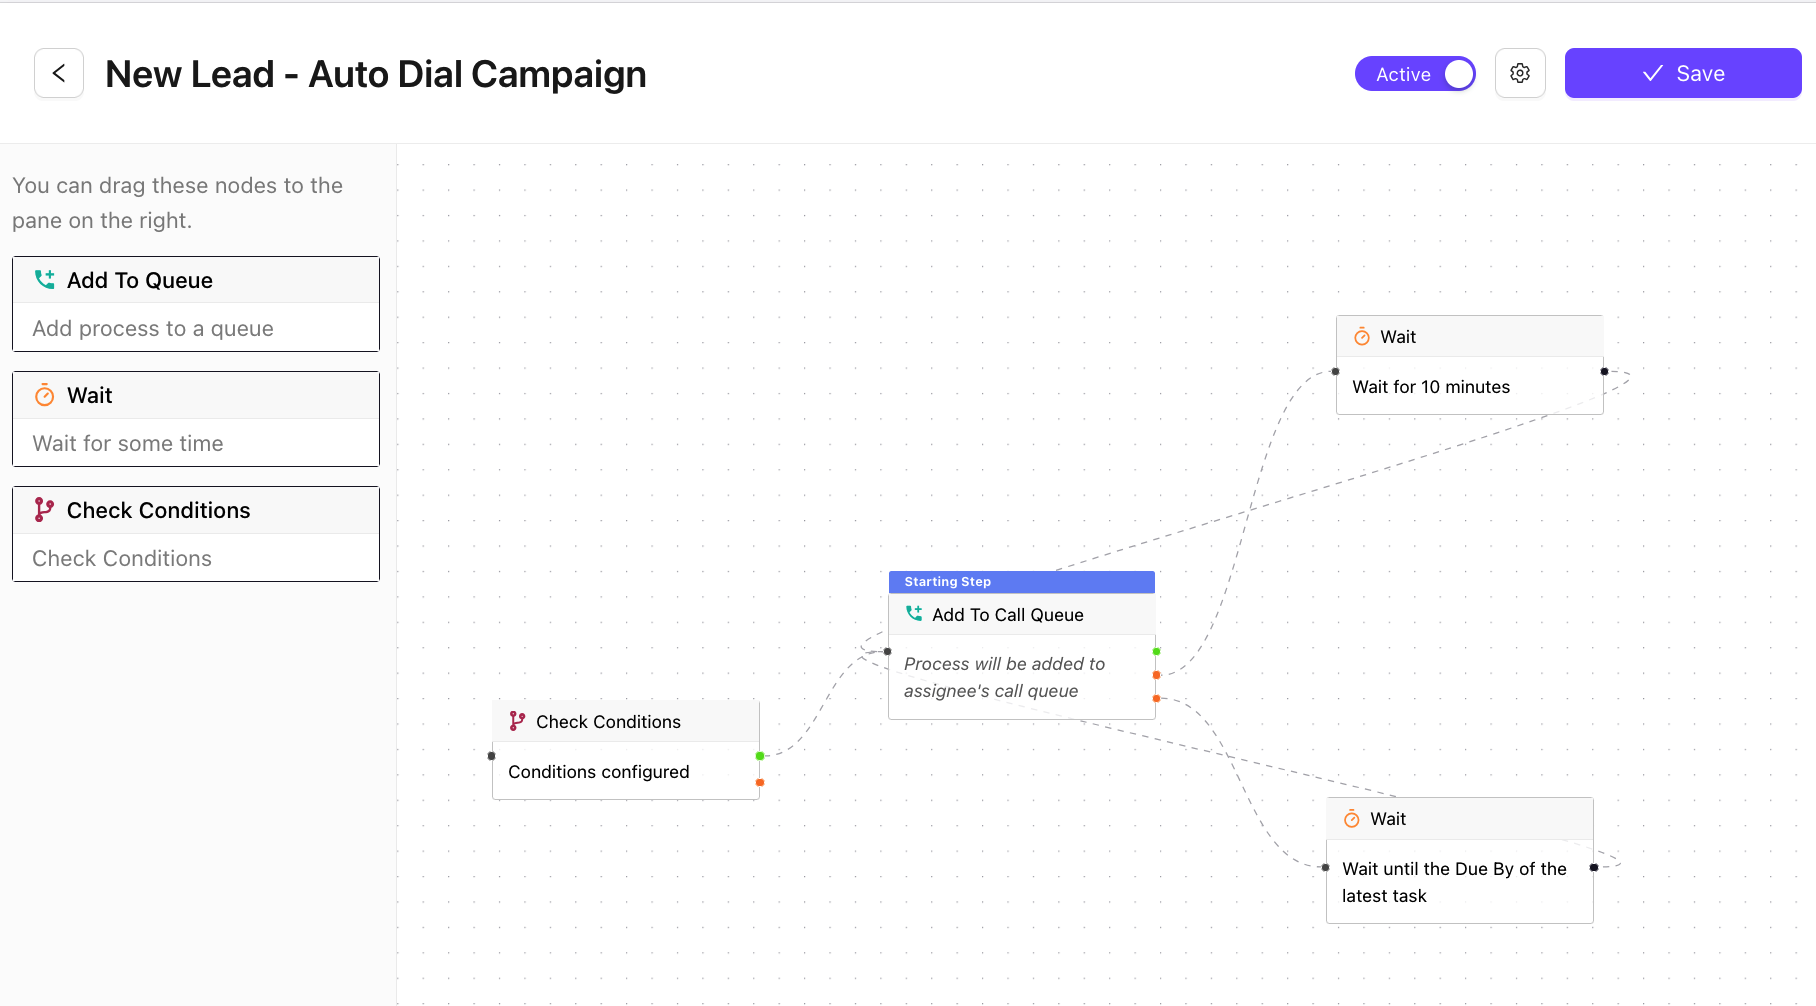
Configure Auto-dial Campaigns
Nodes
- Check Conditions ( To Qualify the Add the Queue)
- Add to Call Queue (Lead will be added to the Lead Assignee's Call queue )
- Wait (Add a wait time for non connected calls or no response from Assignee)
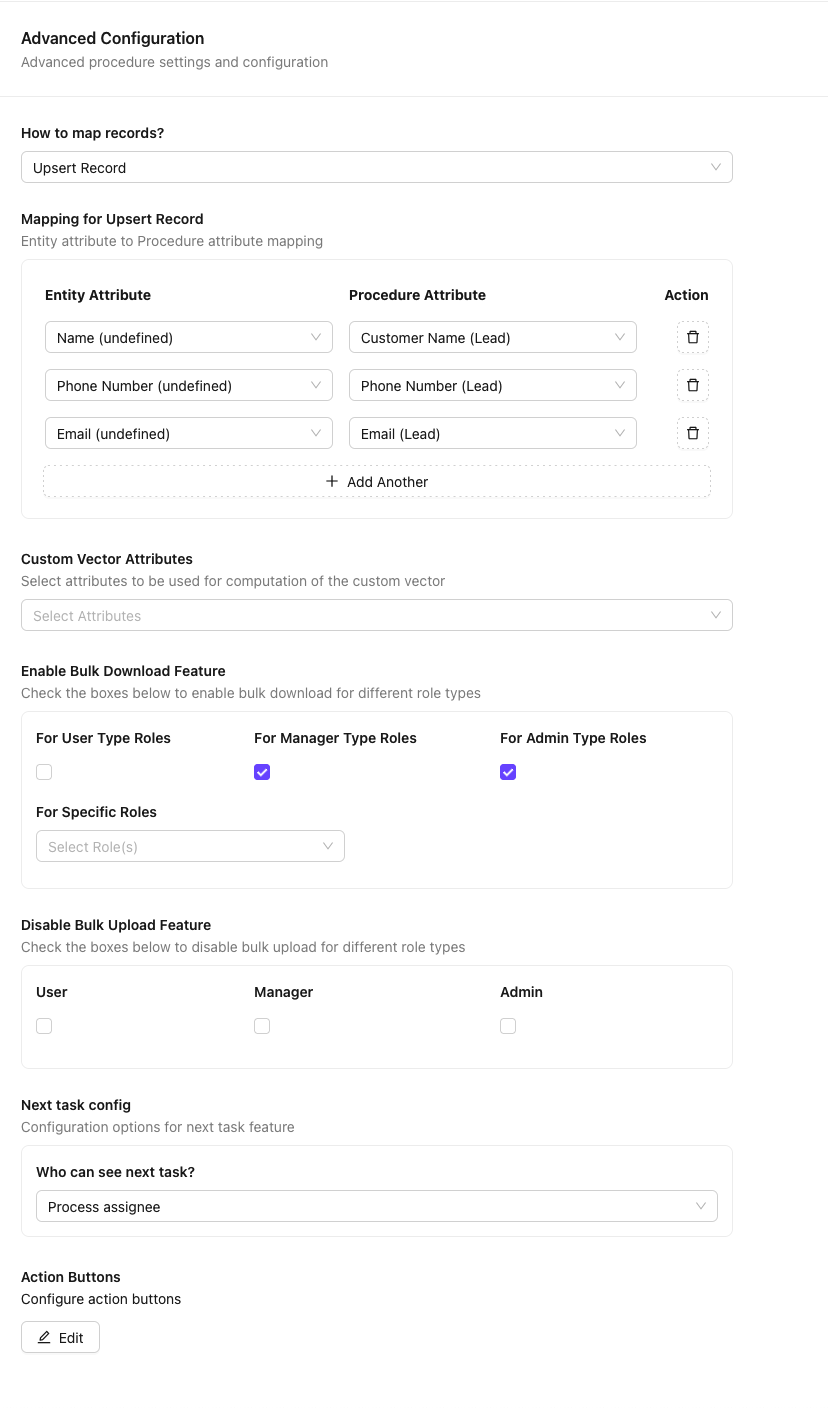
20. Advanced
The Advanced section consolidates high-level configuration options that govern lead records at a system level. These settings are typically managed by administrators and affect platform-wide behaviour.
- Configure record and entity-level settings to control lead data structure and visibility.
- Enable or disable high-level features such as lead merging, scoring, or external integrations.
- Set up bulk download options for lead data exports in CSV or Excel format.
- Manage task configuration at the lead level - including task display, ordering, and completion behaviour.
- Access developer and integration settings for API-based lead creation and updates.